While there are plenty of all-in-one substitutes out there, there’s nothing quite like the personalisation of a fully watercooled system. Knowing where to start can be intimidating for newcomers, but Thermaltake’s new guide to watercooling walks users through the process step by step, from gathering the hardware to fitting the tubing.
Outlining the benefits of watercooling, Thermaltake states that the thermal conductivity of pure water is approximately “30 time greater than air and takes a lot longer for the temperature of water to rise” in comparison. A pump pushes the coolant to the waterblocks connected to each component before dissipating the heat through a radiator. This process is then repeated thanks to the loop pushing the coolant around indefinitely.
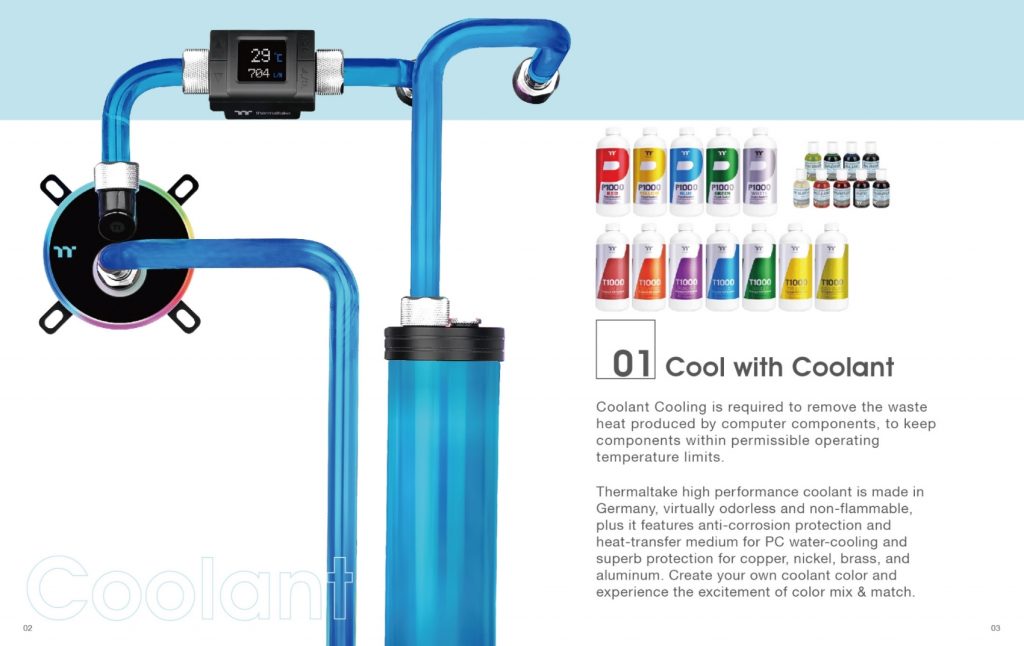
‘Coolant’ is the term used for the liquid that runs through the tubing in order to cool components. While aesthetic is important given the range of colours and transparency available, the main priority is to ensure that the substance is non-flammable, anti-corrosive and effective at transferring heat. Thermaltake’s coolant ticks all of these boxes, as well as being “virtually odourless.”
The case is perhaps the most important thing to choose alongside coolant, coming in a variety of sizes. It isn’t impossible to watercool Cube and Mini Cases, but it’s ideal to choose a chassis designed with space for radiators and tubing in mind, such as Super Towers, Full Towers and in some cases Mid Towers. The latter is the most popular option thanks to its good balance of desk space, however not all Mid Towers can fit every size of radiators. It’s always best to check compatibility on a manufacturer’s website beforehand.
Next, Thermaltake advises to choose the CPU based on the user’s need for single-threaded and multi-threaded workloads, followed by either a gaming or workstation-oriented graphics card. There are a range of features on each motherboard, but the choice will largely be dependent on processor and memory type compatibility, as well as the size of case. Most cases leave enough room for Mini-ITX, Flex-ATX and Micro-ATX motherboards, but larger chassis would be required for ATX, E-ATX or W-WTX variants. Whatever is chosen must then be paired with a suited power supply unit with all of the right cables.
Once the core components have been chosen, Thermaltake draws the customer’s attention to cooling products with synchronised Razer Chroma, ViewSonic, TeamGroup or TT RGB lighting. So far, the company has lit up almost every aspect of the watercooled system, from CPU, GPU and RAM waterblocks to fans, radiators and even the pump with its Pacific Series. The lighting is then controlled with the TT RGB Plus software, smartphone application or even Amazon Alexa. Don’t forget to pair the lighting with matching sleeve cables.
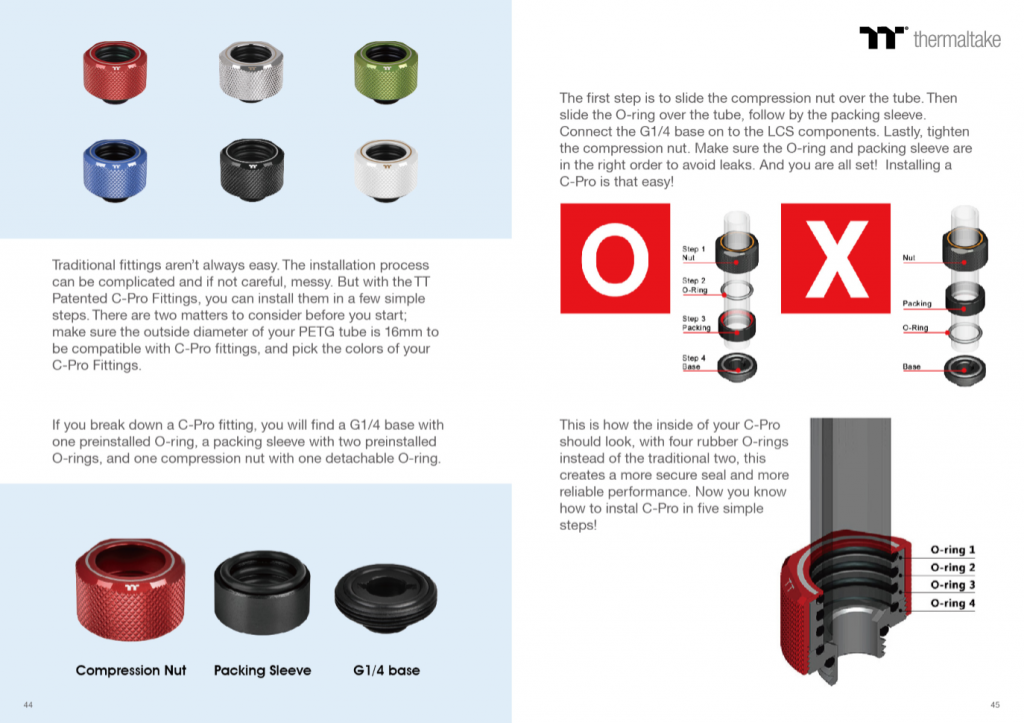
Many first-time users find themselves worried about choosing the wrong sized fittings, or damaging the components when installing them. Thermaltake states that its C-Pro Fittings are designed to be easy to handle, provided that the user is utilising 16mm PETG tubing. The Compression Nut slides over the tubing first, followed by the O-Ring, the Packing Sleeve and then the G1/4 base. Once these are in order, the user simply needs to tighten the Compression Nut in order to avoid leaks.
For a more comprehensive breakdown, Thermaltake’s third iteration of “Liquid Cooling News” is available on Dropbox. Products can be purchased from SCAN in the UK and other selected retailers around the globe.
KitGuru Says: It seems as though building a watercooled system simply requires users to be aware of the size of the case, tubes and fittings before purchase. Other than that, the guide makes it a pretty simple process. Are you interested in customising your own watercooled loop?
 KitGuru KitGuru.net – Tech News | Hardware News | Hardware Reviews | IOS | Mobile | Gaming | Graphics Cards


