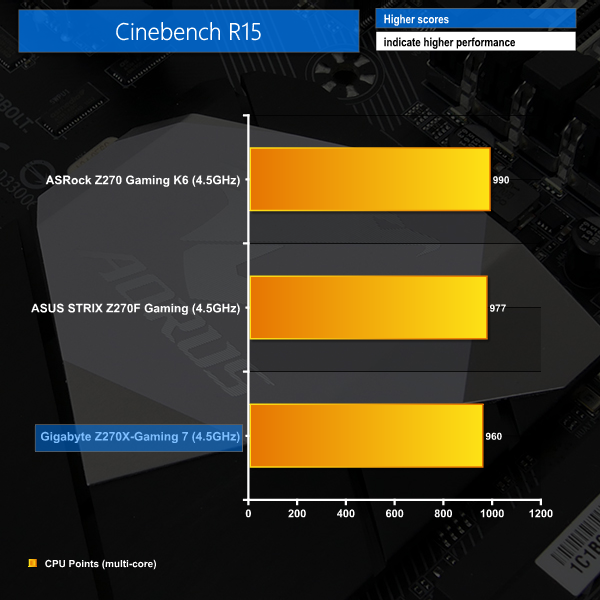
Cinebench R15
Cinebench is an application which renders a photorealistic 3D scene to benchmark a computer’s rendering performance, on one CPU core, all CPU cores or using the GPU. We run the test using the all core CPU mode.
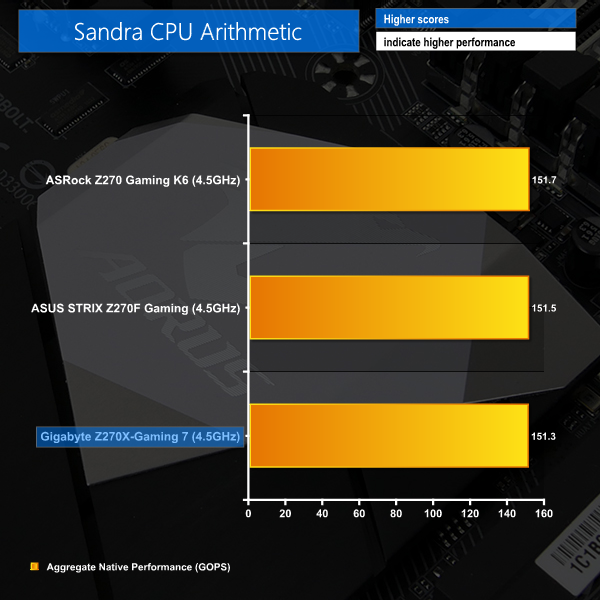
Sandra Processor Arithmetic
SiSoft Sandra 2016 is a multi-function utility program that supports remote analysis, benchmarking and diagnostic features for PCs, servers, mobile devices and networks. We run the application’s processor arithmetic test to gauge the CPU performance on each tested motherboard.
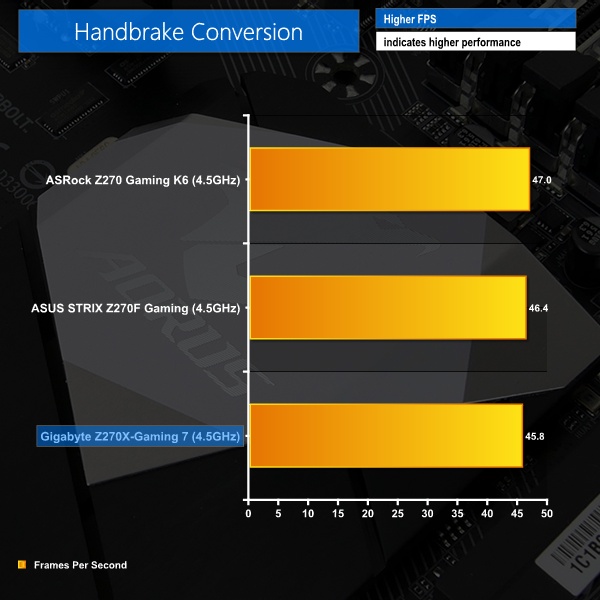
Handbrake Conversion
Handbrake is a free and open-source video transcoding tool that can be used to convert video files between different codecs, formats and resolutions. We measured the average frame rate achieved for a task of converting a 6.27GB 4K video using the Normal Profile setting and MP4 container. The test stresses all CPU cores to 100% and shows an affinity for memory bandwidth.
CPU-related performance from Gigabyte's Aorus Z270X-Gaming 7 is competitive against ASRock and ASUS alternatives. The Aorus board does fall a little short in Cinebench and Handbrake performance but the margin is small. This slight percentage shortfall is potentially attributed to the system resources being used in the background by Gigabyte's OS software.
 KitGuru KitGuru.net – Tech News | Hardware News | Hardware Reviews | IOS | Mobile | Gaming | Graphics Cards


“The individual audio results should be interpreted with care due to the difference in RightMark Audio Analyzer’s reaction to the Creative-based solution used on Gigabyte’s board versus the Realtek codec of its competitors.”
I don’t understand what that means.
I have this board and while it’s a tremendously beautiful work of art, RGB Fusion doesn’t hold its brightness settings after reboot. Which, can be annoying when the PC is on your desk just to your right and you don’t want those beautiful bright greens to be /too/ bright, so you tone them down to the lowest setting (25%) only to find that you have to do it every single time you boot into Windows 10 Pro x64. I looked to see if there were any obvious files in the RGB Fusion folder that would hold settings for such and if they perhaps were read-only, but the only settings files I found were xml’s for various demo effects, I would assume. I’ve tried setting the main exe’s in the folder to run as administrator and see if that works. No dice. Seems as if Gigabyte might have a little more work left to do with this, and funny enough, their GvLedServices.exe file descriptions weren’t filled out. They were left as “TODO: ” .. “TODO: ” .. “TODO: ” under Properties > Details. I guess that slipped their “to do” list. It shows up as “TODO: ” in Task Manager > Processes, which could potentially confuse someone that isn’t privy to the program not quite being as polished as it should be.
Also, I had an issue where, suddenly, when trying to run the RGB Fusion program, it would load the dialog box, but that’s it, and sit there with blank panels and “Please Wait…” flashing through the RGB spectrum in the middle of the main panel for around 5 minutes before finally loading, then making any changes would take another few minutes or so, but they wouldn’t actually do anything. The power switch at the top no longer turned the LED’s off, either. I had to uninstall the program, reboot, reinstall the program and then run each process from its folder manually to get it to work again. It’s been working since then, even after reboots, but still doesn’t hold the brightness setting.
https://uploads.disquscdn.com/images/7bd0e4c346835a42abdf525b89866c38c628c6205a00e90bada27f21db0bbf2f.jpg
Might as well be written in another language and then translated back to English with Google translator.