Asus' TUF series of motherboards takes a different approach towards the market when compared to the gaming, overclocking, and ‘standard' line-ups each vendors has in its product catalogue. Built primarily for reliable stability through enhanced thermal management and validated industrial design, can the Sabertooth Z170 Mark 1 live up to its ‘TUF' series branding?
With the Sabertooth Z170 Mark 1, Asus deploys many of the features that one would expect to see from an almost £200 motherboard. There's support for up to 3-card CrossFire and 2-card SLI. PCIe storage capabilities can be accessed via SATA-Express and M.2 connectors. A strong audio solution is found alongside a pair of Gigabit Ethernet ports. And there's support for up to 64GB of DDR4 operating near to 4GHz.
But the main event is undoubtedly the motherboard's unique approach to industrial design. With fine-grained thermal management being one of the primary drivers for Asus' reliability target, the board sports the Thermal Armor covering that we have come to associate with Sabertooth motherboards. Thermal segregation and active fan mounts are key features of Thermal Armor.
Does the Asus Sabertooth Z170 Mark 1 have the correct recipe to tempt consumers and power users who desire a high-end motherboard for their Skylake-based system?
Features:
- USB 3.1 onboard: One Type-A port plus a reversible Type-C port
- Thermal Armor with Flow Valve – Strengthen your ability. Totally boosted airflow.
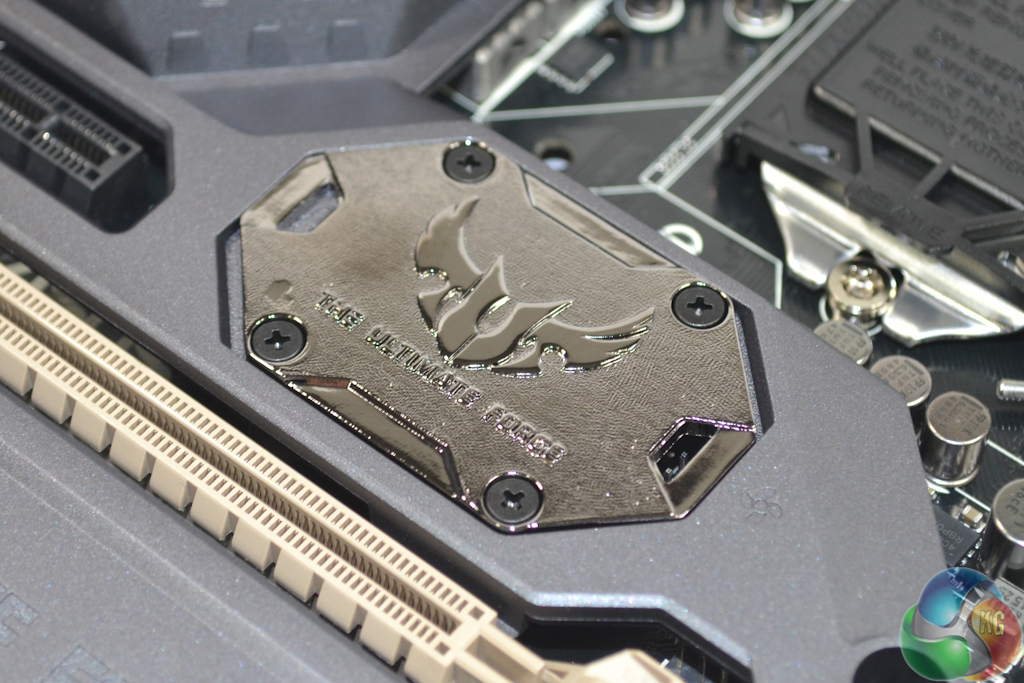
- TUF Fortifier – Damage Protection and Improved Cooling
- TUF Detective 2 – system information at your fingertips
- TUF ICe & Thermal Radar 2 – Total cooling system
- Dust Defenders – Repel the Dust, Expand the Lifespan
- TUF Components [TUF 10K Ti-Caps, TUF Alloy Chokes & MOSFETs; Certified by Military-standard
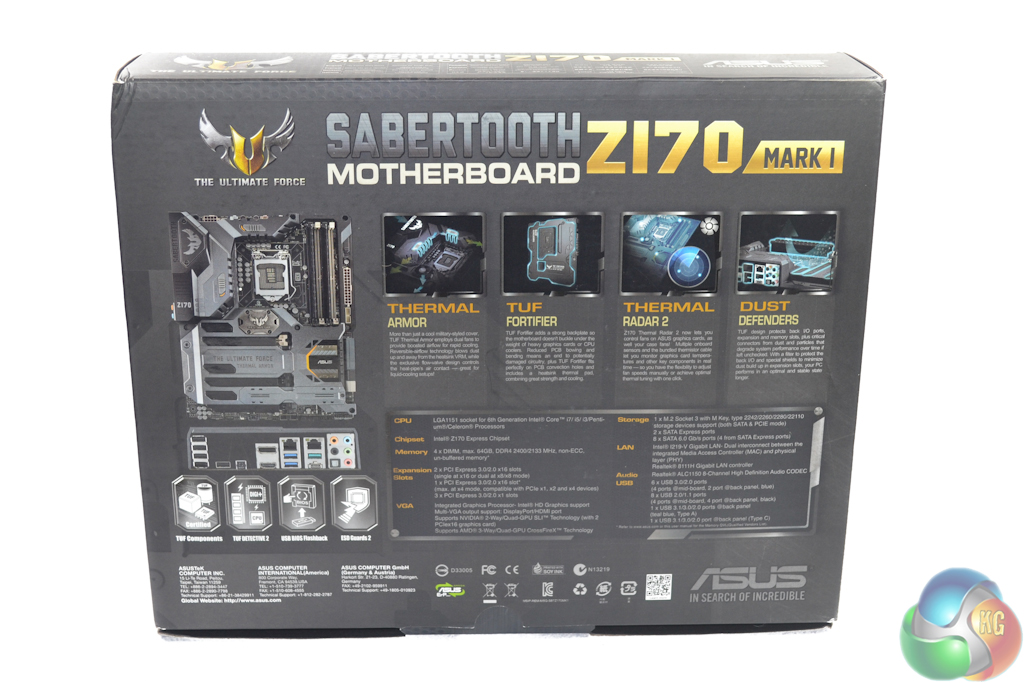
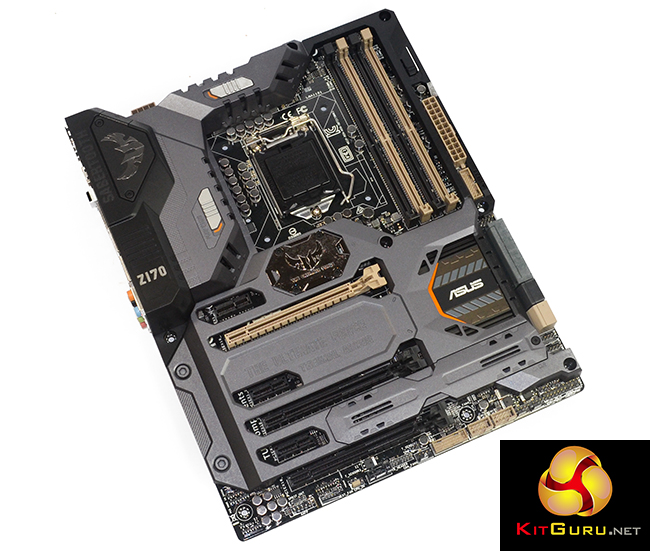
Asus ships the Sabertooth Z170 Mark 1 in typical TUF series packaging. A grey box is home to plenty of information relating to the component.
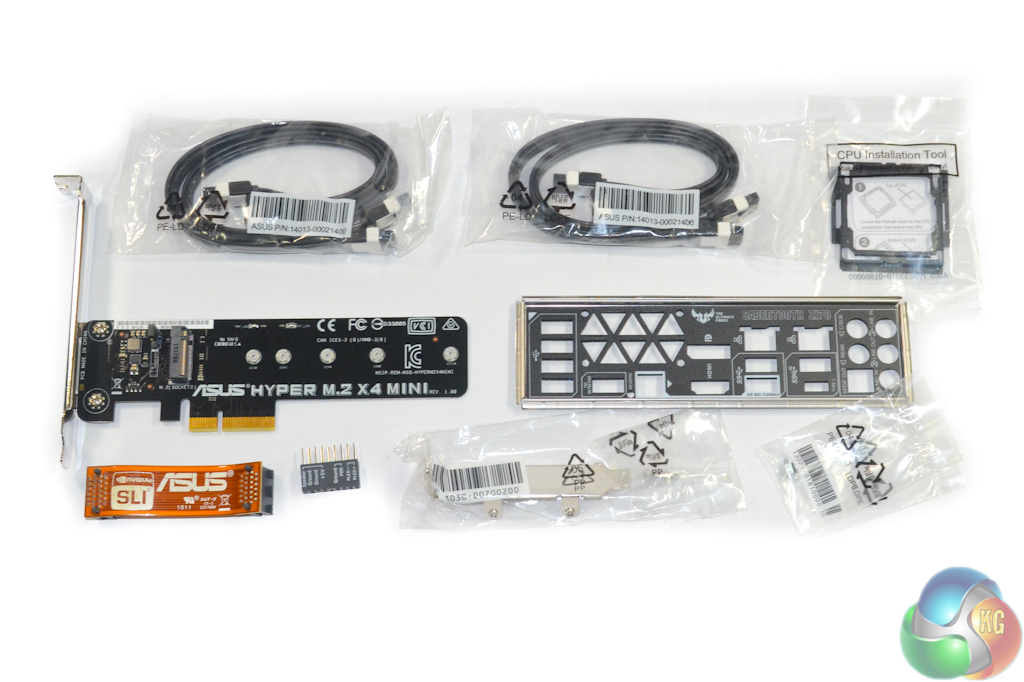
A very healthy bundle is supplied alongside the board, which is positive to see given its premium asking price. The bundle consists of:
- 4x SATA cables
- CPU installation tool
- Rear IO shield
- Q-connector block
- Brown SLI ribbon
- Asus Hyper M.2 x4 Mini PCIe adapter (including half-height PCI bracket and mounting screws)
I am disappointed by the inclusion of an ugly brown SLI ribbon – Asus should know by now that black is the standard for high-end consumer builds. Four SATA cables is also a little irritating given the board's eight SATA 6Gbps connections.
The Hyper M.2 x4 Mini PCIe adapter is an excellent addition as it allows a hot M.2 SSD (such as some of Samsung's NVMe drives) to be installed in an orientation that will provide it with direct airflow from chassis fans. One can also use the adapter to form a RAID array of PCIe M.2 SSDs with the other device being mounted in the onboard M.2 slot.
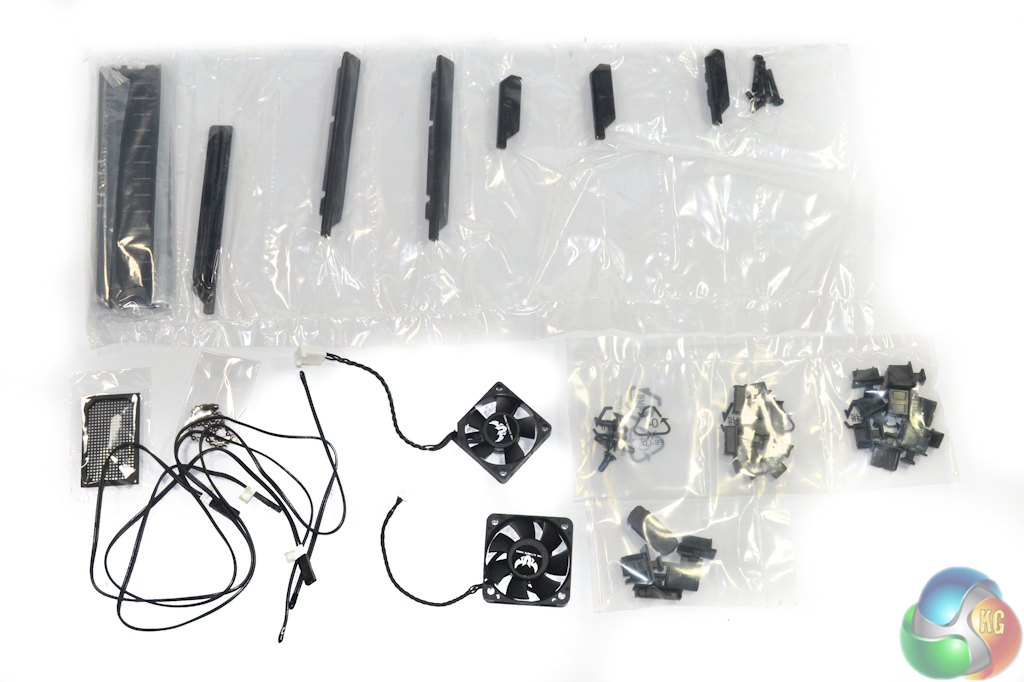
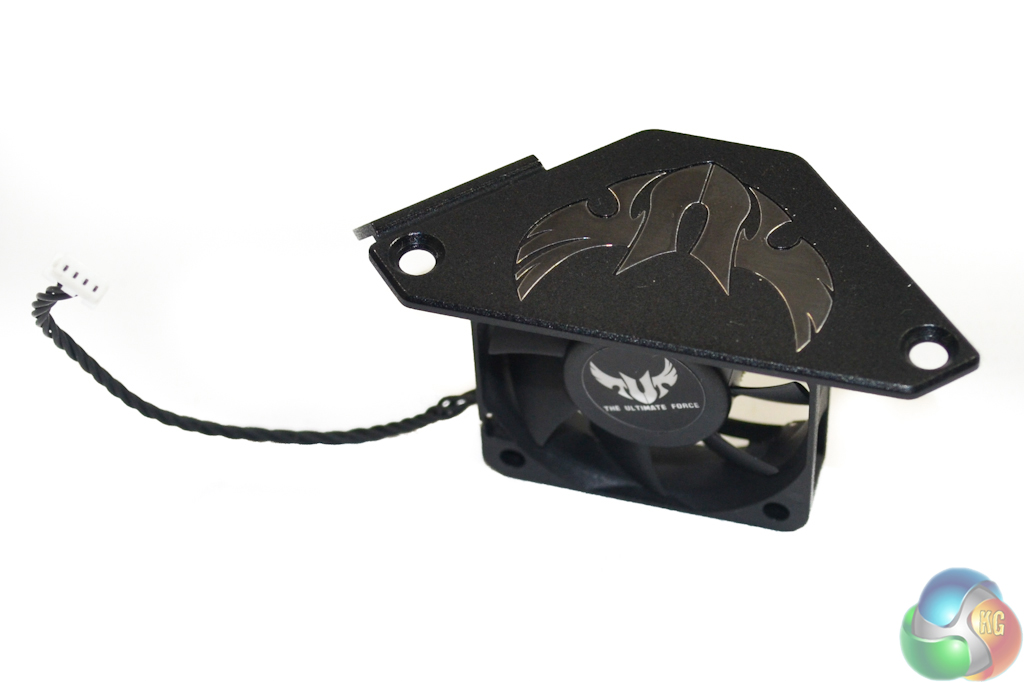
Asus also supplies a healthy variety of cooling-related hardware. This includes plastic covers for unused slots (which prevent dust entry), three thermal diode cables that can be positioned wherever a user desires, and two cooling fans.
The 40mm fan uses a laptop-style mini fan header and should be installed in the rear IO section (as shown later in the review). The 35mm fan uses a standard 3-pin fan header and mounts in the motherboard's ‘northbridge' location.
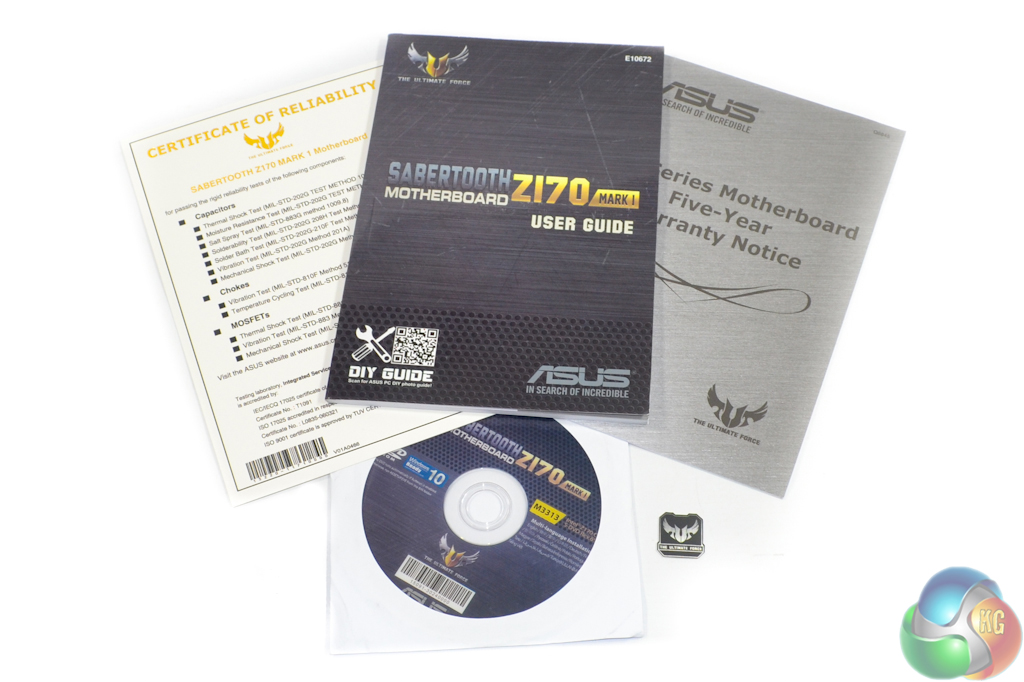
The usual affair of product documentation, drivers CD, and case sticker is accompanied by a certificate of reliability which highlights the test processes that the board has passed.
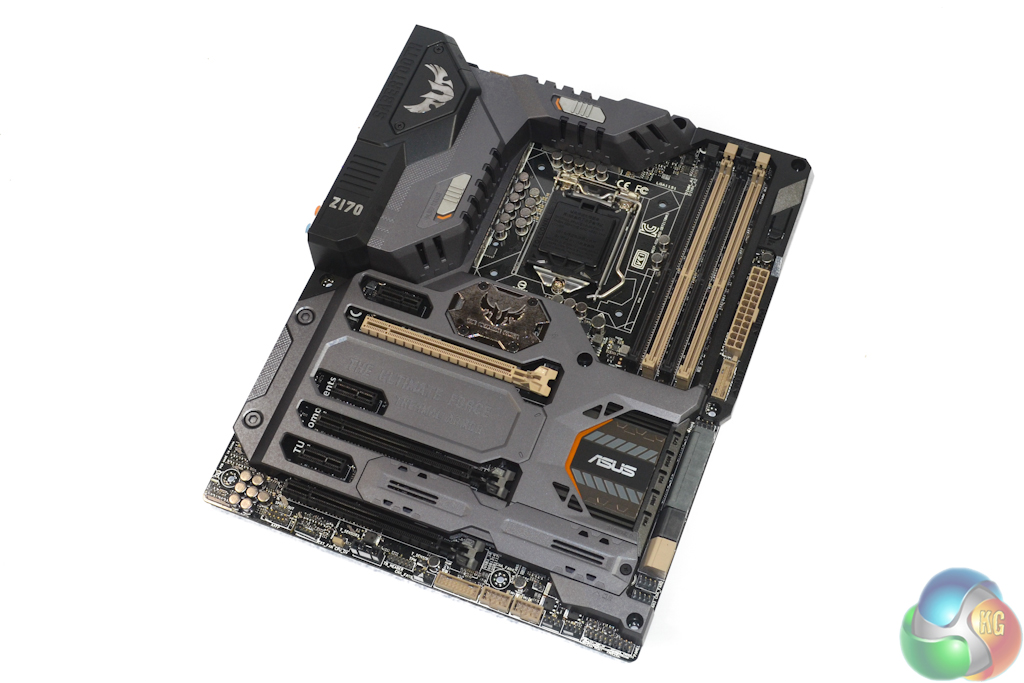
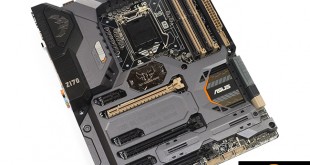
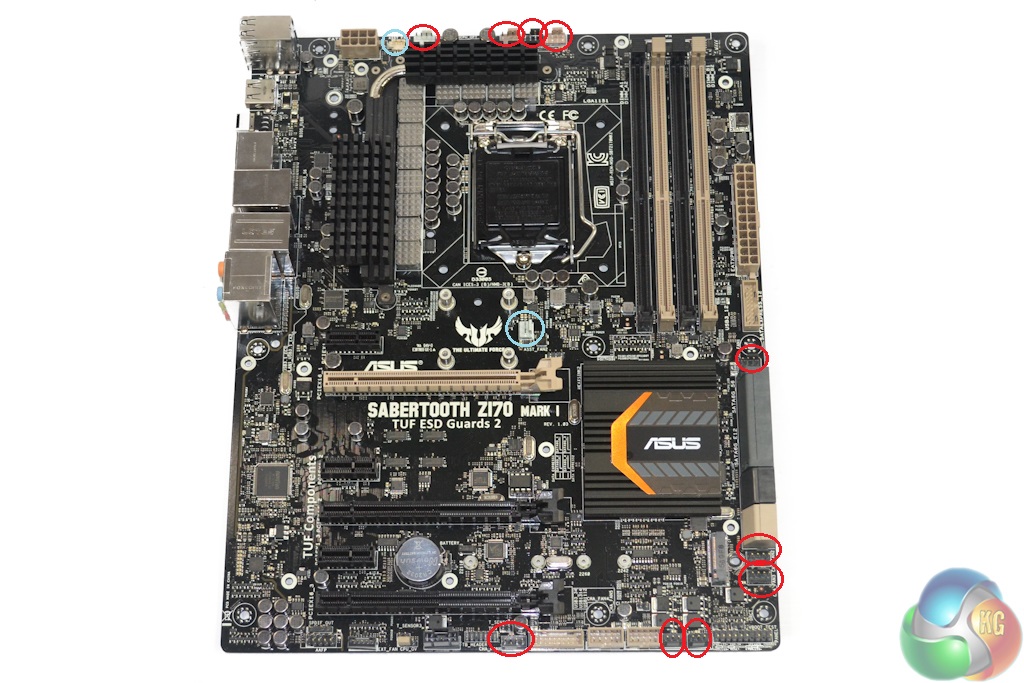
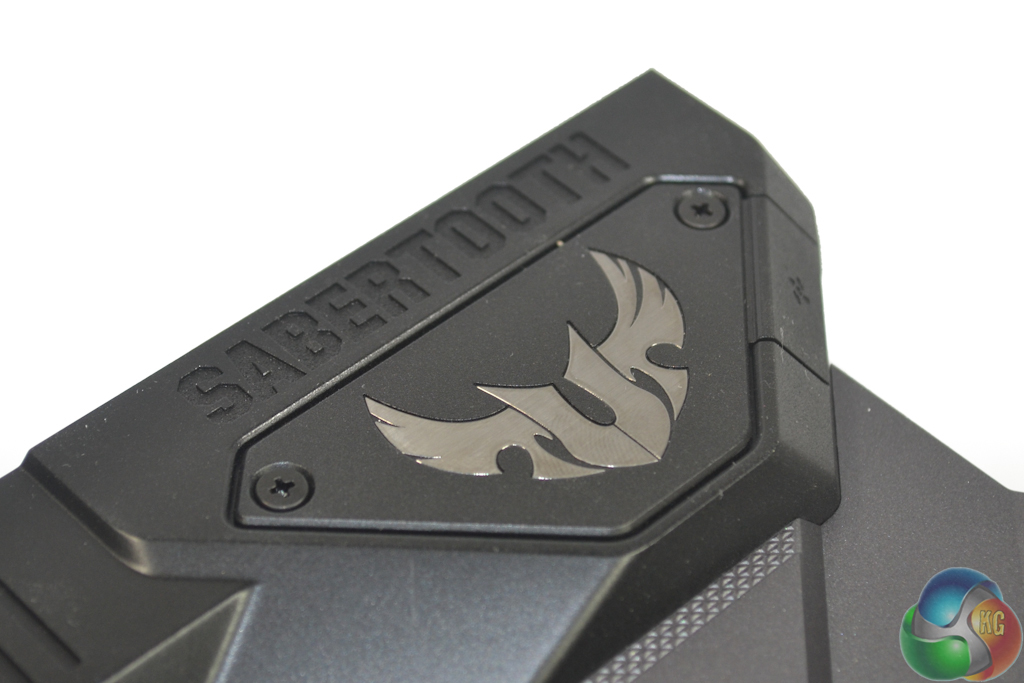
The Asus Sabertooth Z170 Mark 1 motherboard conforms to the standard ATX form factor. A largely black and grey colour scheme that is accompanied by brown and beige highlights is difficult to analyse.
Aesthetic preference is a very subjective topic, however the dark Thermal Armour covering and black port blocking pieces should help to create a good-looking, dark build.

The job of Asus' front-side Thermal Armor plastic cover is to segregate primary areas of heating. The motherboard's PCB is completely segregated from a hot graphics card thus alleviating a significant heat affected zone in close proximity to the board's graphics-housing PCIe slot.
With thermal segregation via a good resistor of heat such as plastic comes the challenge of extracting thermal energy away from the motherboard PCB. Two fan mounts are cut into the Thermal Armor cover, and their function seems to be of importance.
The 35mm fan positioned below the CPU socket will feed (relatively) cool air beneath the plastic cover leading for the heat-absorbing coolant to flow down towards the lower board section, away from the primary temperature-sensitive expansion cards. The 40mm fan mounted in the rear IO section pulls clean air into a dedicated area that is used to cool the motherboard's VRM components.
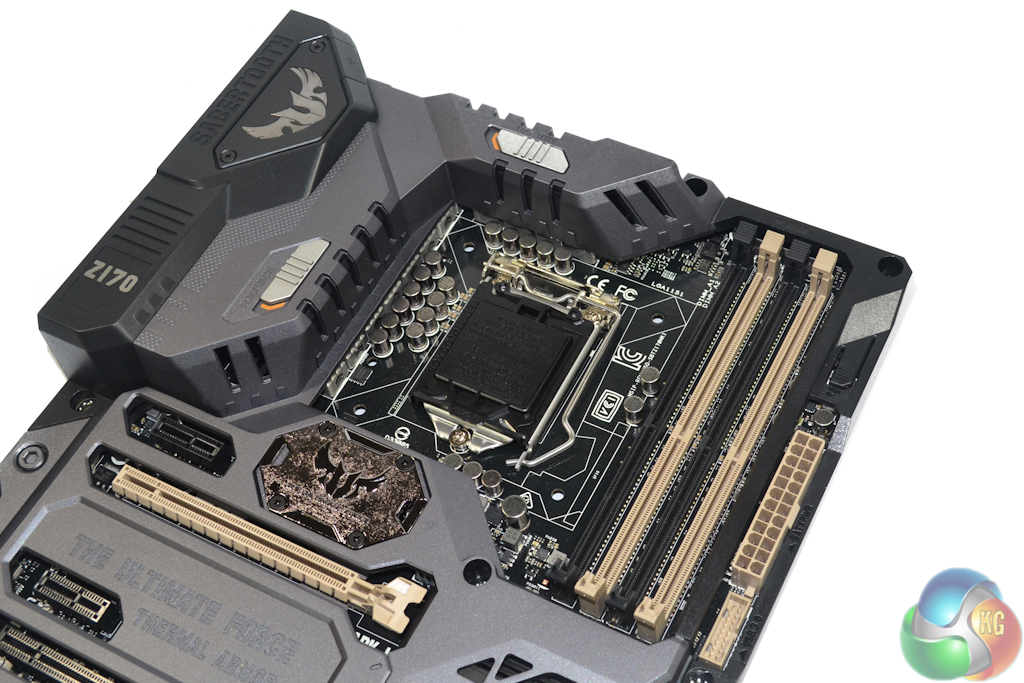
Intel's LGA 1151 CPUs can be installed alongside up to 64GB of DDR4 memory in dual-channel operation. Asus says that the single-latch DIMM slots are able to run memory at up to 3733MHz via overclocking, however higher frequencies may be plausible with the correct BIOS, memory kit, and CPU combination.
Spacing between the CPU socket and DIMM slots is decent, however do not expect to bypass interference if you want to use a large CPU air cooler with excessively tall memory modules, such as KLEVV's Cras series DDR4. A Noctua NH-D14's fin array completely overhangs the first DIMM slot, and that does not account for the front fan's necessary clearance.
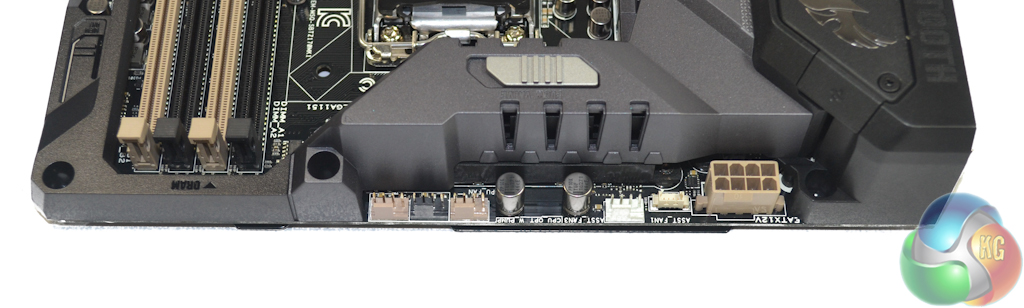
As well as the 8-pin CPU power delivery connector, a total of five fan headers are found along the board's upper edge. Two 4-pin headers handle CPU fans, one next to that pair is dedicated for AIO watercooling pump duties (where 100% speed operation is important), and the two remaining handle ‘Assistant' fan duties.
Of those two ‘Assistant' fan headers, one uses a mini laptop-style connector and is explicitly allocated for controlling the 40mm rear IO intake fan.
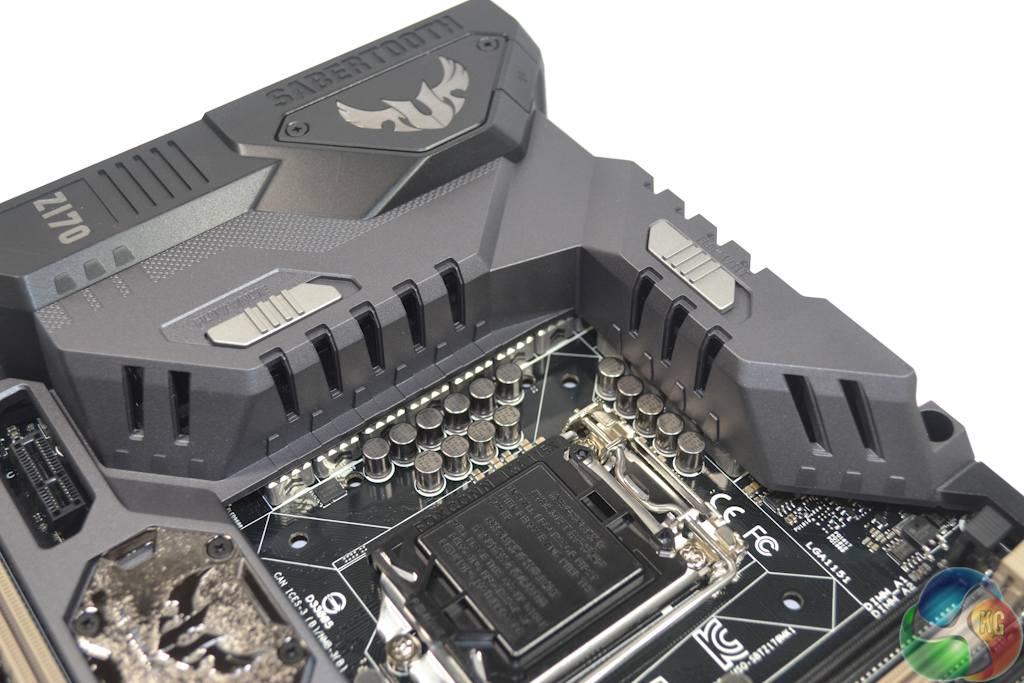
Thermal Armor features a pair of flow valve switches located in the VRM heatsink area. Opening or closing these valves allows for adjustments to the way in which the VRM circuitry is cooled. With a down-draft CPU cooler, for example, opening the flow valves will allow incidental airflow to entire the MOSFET heatsink area and provide cooling.
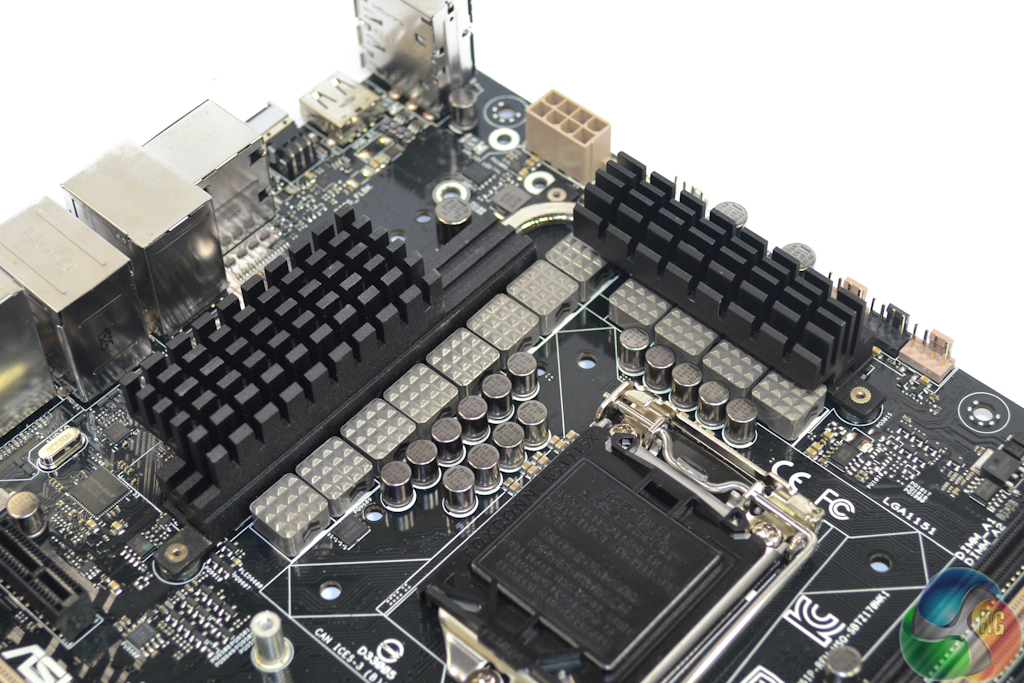
A hefty pair of metal heatsinks, which are connected via a heatpipe, cool MOSFETs for the twelve power delivery phases. I am fond of the heatsink design – there are no gimmicky styles in the form of marketing features, but instead a smart fin layout which should permit for sufficient heat transfer.
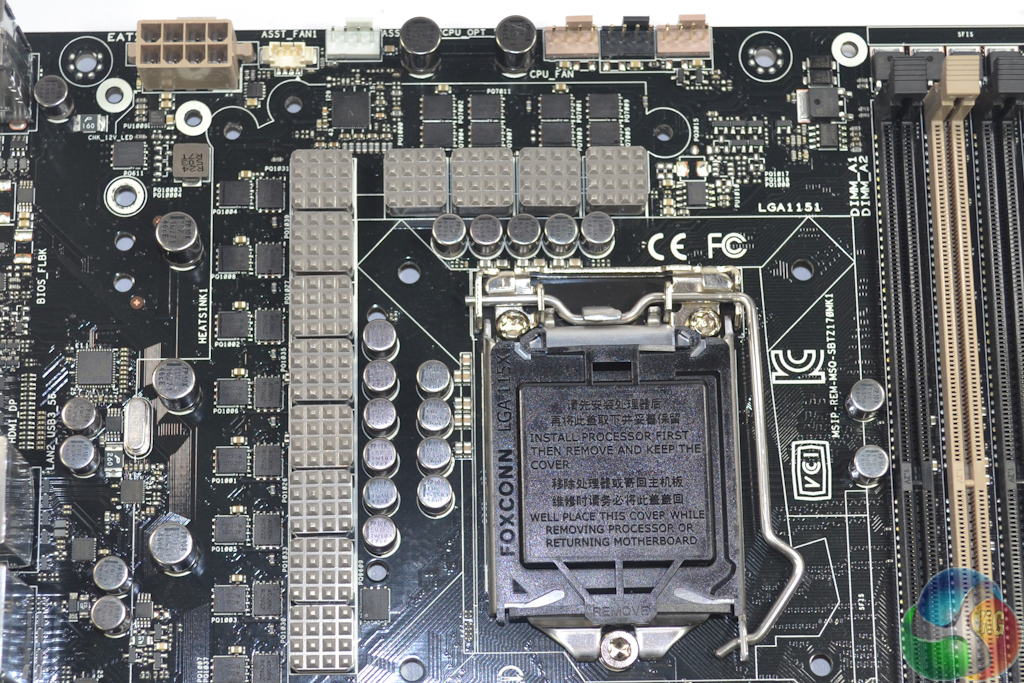
The primary power delivery components include 10K-rated ‘TUF Ti-caps', 40A-rated alloy chokes, and ‘TUF MOSFETs'. Asus claims that enhanced durability is achieved by the alloy chokes operating at lower temperatures, the capacitors being able to withstand higher operating temperatures, and the MOSFETs having a lower resistance.
Managing the power delivery system is a Digi+ ASP14051 PWM controller. Twelve ON Semiconductor 69A-rated NTMFS4C06N MOSFETs (marked 4C06N RCNQZ) and a further dozen 52A-rated NTMFS4C09N MOSFETs (marked 4C09N RCD4H) form the front-mounted high- and low-side MOSFET configuration. An additional eight NTMFS4C06N MOSFETs are found on the motherboard's rear side.
Ten International Rectifiers IR3535M MOSFET drivers are utilised. We also identified International Rectifiers IR3595 controllers in the vicinity of the VRM components.
The CPU is fed by eight power phases while the integrated GPU receives the remaining four. Asus' Digi+ ASP1103 controller is used to manage two-phase the memory subsystem.
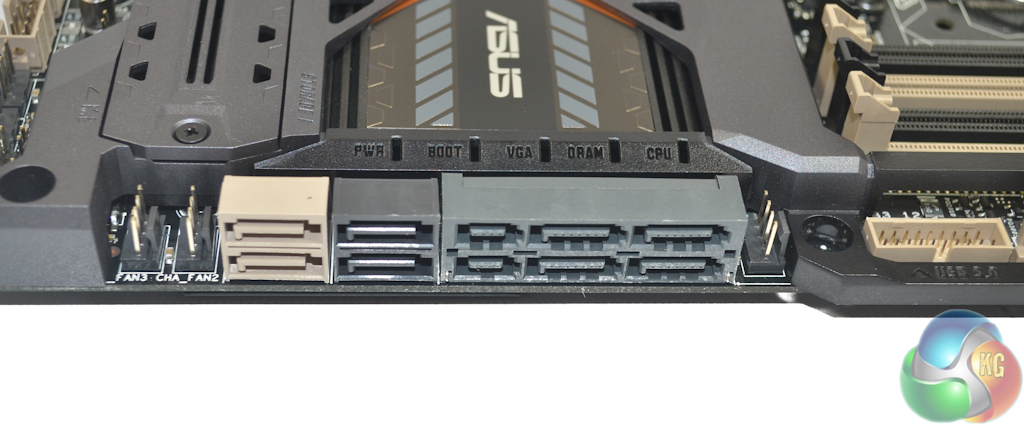
A total of eight SATA 6Gbps ports are found on the board, two of which originate from the ASMedia ASM1061 controller and should be reserved for slower storage devices. Four of the chipset-fed SATA 6Gbps ports double up as a pair of SATA-Express connectors which have found resurgence thanks to front panel USB 3.1 devices.
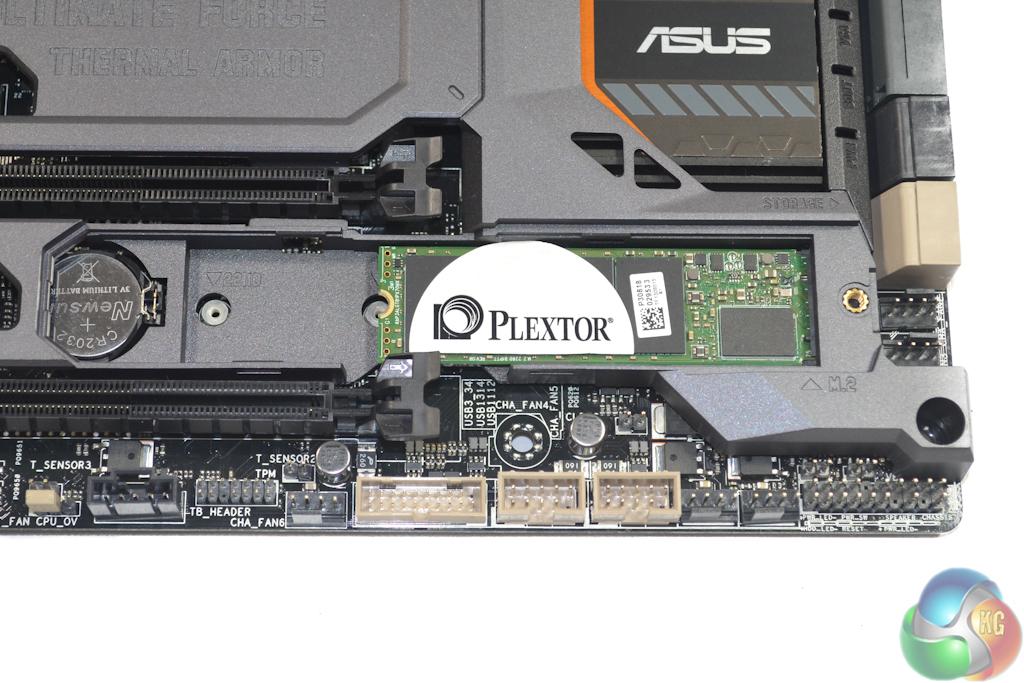
PCIe and SATA SSDs up to 110mm in length can be installed in the board's covered M.2 slot. Four PCIe Gen 3 lanes from the Z170 chipset provide support for transfer rates of up to 32Gbps, however the PCH's flexible IO ports can switch the operation to a SATA 6Gbps connection.
The M.2 SSD is installed beneath a dedicated cover in Thermal Armor. This design helps to segregate an SSD from other heat sources (and hides ugly green PCBs) but it will also cause the drive to heat up significantly due to minimal incidental airflow. This could cause issues for drives prone to thermal throttling, such as Samsung's modern NVMe M.2 SSDs.
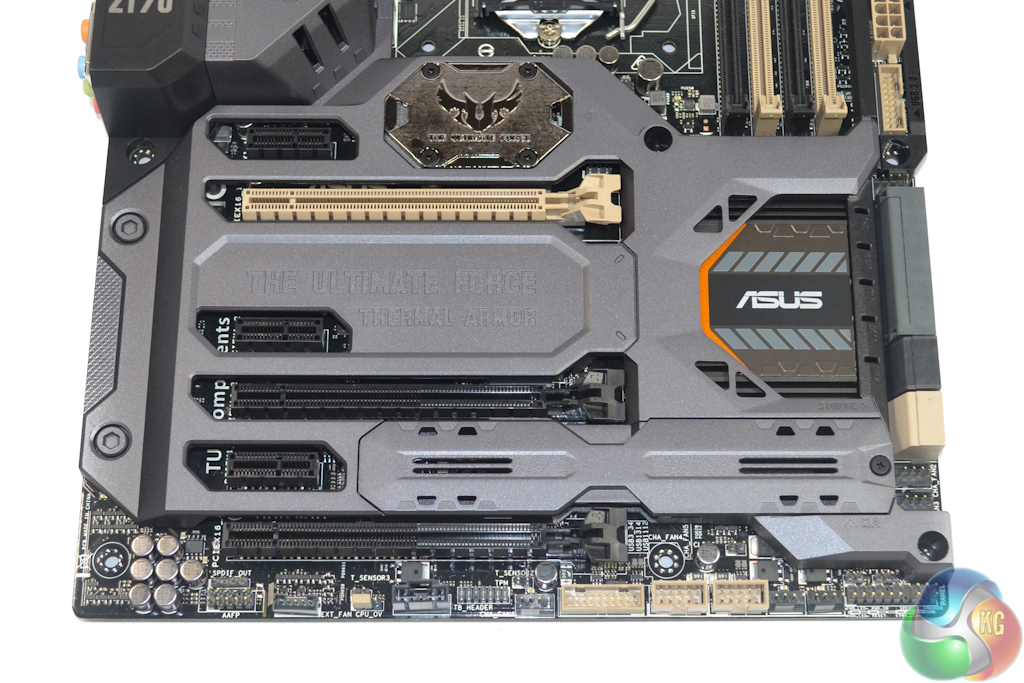
Up to two cards are supported in SLI or three cards in CrossFire due to its less stringent bandwidth requirements. The upper two full-length PCIe slots receive their lanes directly from the CPU and can split them as x16/x0 for a single graphics device, or x8/x8 for a pair of GPUs.
The bottom full-length slot receives four PCIe 3.0 lanes from the Z170 chipset and should be reserved for use with devices such as a PCIe SSD or RAID card rather than potentially bottlenecking an AMD GPU. Using the slot in its PCIe x4 mode renders two of the SATA 6Gbps ports inoperable, however the alternative PCIe x2 mode retains complete SATA port operation.
Spacing between the slots is smart – two dual-width graphics cards can be installed with a cooling gap between them. And that is while also leaving room for an additional high-bandwidth device in the lowermost slot.
The remaining three PCIe 3.0 x1 slots can be used for supplementary devices such as WiFi adapters and sound cards.
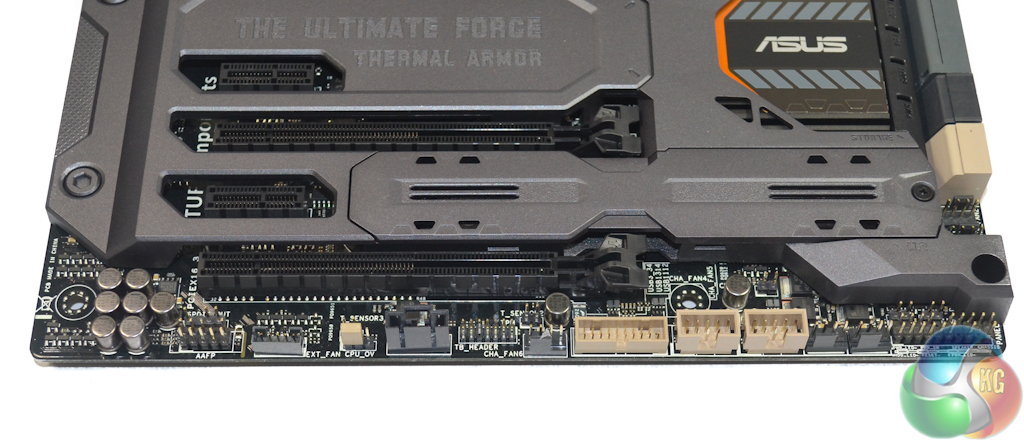
The expected array of front panel ports is found along the lower edge. In addition to those common connectors is a second internal USB 3.0 header (the other is next to the 24-pin port) and multiple fan connections. There's also the EXT_FAN header for connecting an add-on fan control hub.
While the chipset heatsink features a number of activity LEDs, there is no two-digit debug display on the motherboard which is disappointing. A simple two-digit debug display is useful for troubleshooting failed system boots or overclocks.
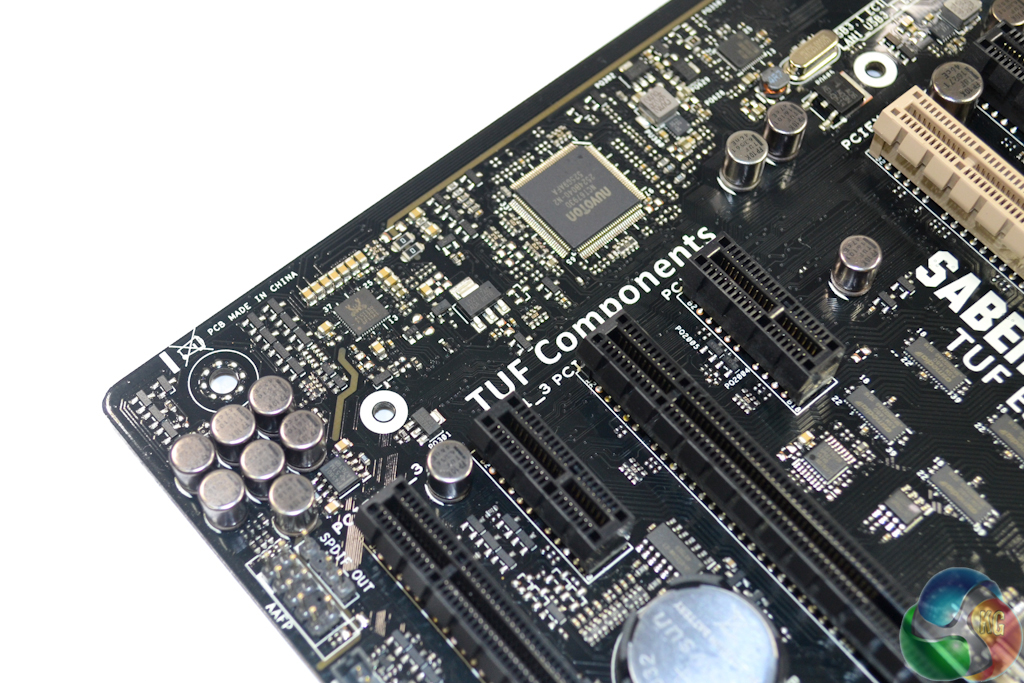
Asus' audio system resides around the popular Realtek ALC 1150 codec. Segregated paths and multiple capacitors are used to minimise signal interference however there is no explicit EMI shielding for the audio chipset. A Texas Instruments R4580i op-amp is also utilised.
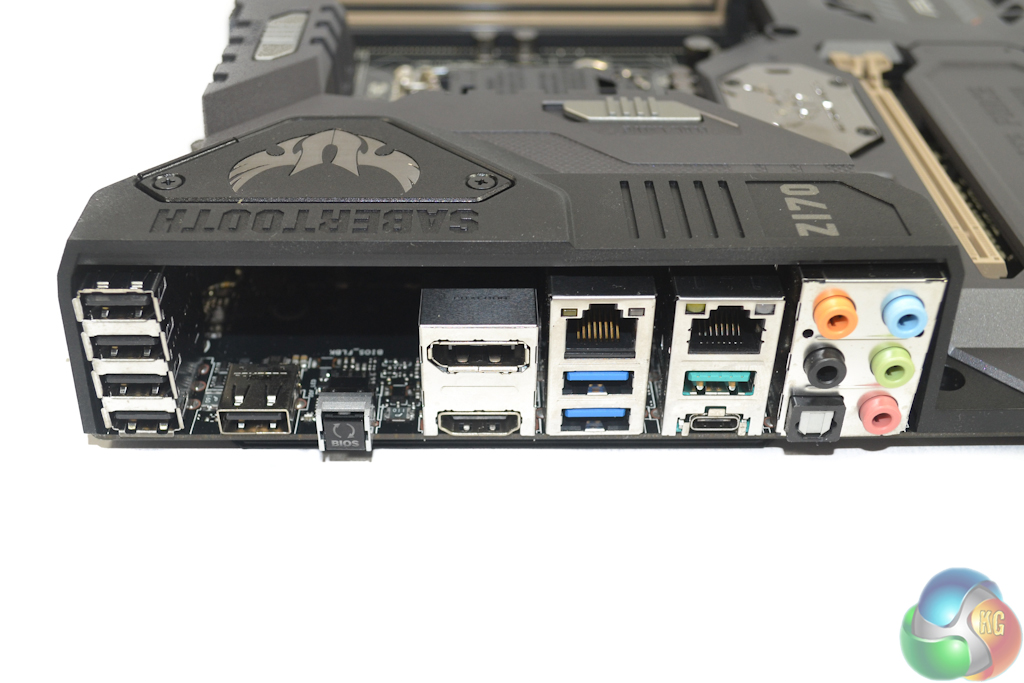
A stack of four USB 2.0 ports is useful for connecting low-bandwidth devices such as a mouse and keyboard. Next to that bank of connectors is the BIOS Flashback button. Some users may be disappointed to see a PS/2 header omitted as it can be useful for troubleshooting measures (especially when using the Z170 chipset with Windows 7).
DisplayPort 1.2 and HDMI 1.4b connectors provide video output via an ASMedia ASM1442K switch. The former supports a 4K 60Hz output from the Skylake chip's onboard GPU. Gigabit Ethernet ports are provided via Intel's I219V and Realtek's RTL8111H chipsets.
Two 5Gbps USB 3.0 Type-A ports are fed from the Z170 chipset. The neighbouring 10Gbps USB 3.1 ports (one Type-A and one Type-C) are provided via an ASMedia ASM1142 chipset, as well as EtronTech's EJ179V and EJ179S logic ICs for Type-C operational capabilities.
The omission of an outright clear CMOS button on the rear IO section will irritate users who enjoy tweaking their fully built system.
No less than a dozen fan headers are distributed around the board, however two of those are specifically allocated duties of controlling the supplied Thermal Armor fans. Asus' UEFI and OS software tools allow a good level of speed control. Nuvoton's NCT6793D and a TUF ICe chipsets manage fan control and monitoring duties.
On the topic of monitoring, I would have liked to see some onboard voltage reading points. This would have provided an extra layer of reliability by taking controller reading errors out of the equation when manually recording voltages or troubleshooting.
Thermal Armor Features
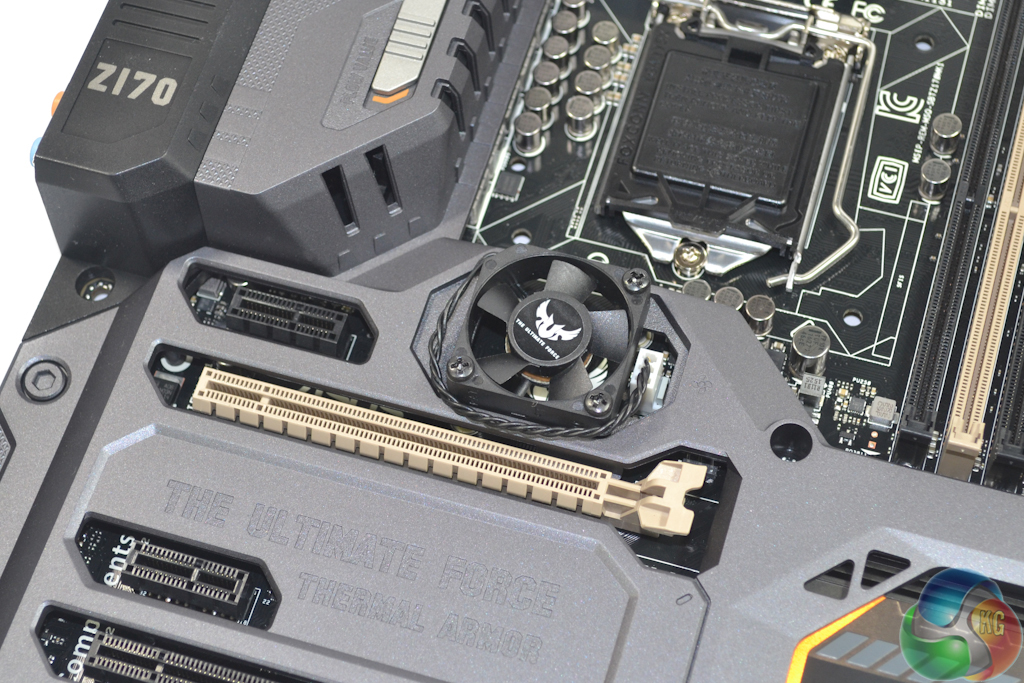
After the slightly awkward removal of a metal covering plate (which can then be used to create a military-style dog tag keyring), the 35mm fan can be installed. This fan forces air beneath the Thermal Armor in order to remove heat from the motherboard PCB and exhaust it towards the bottom of the board.
The 40mm VRM fan is attached to a removable plastic covering for ease of installation.
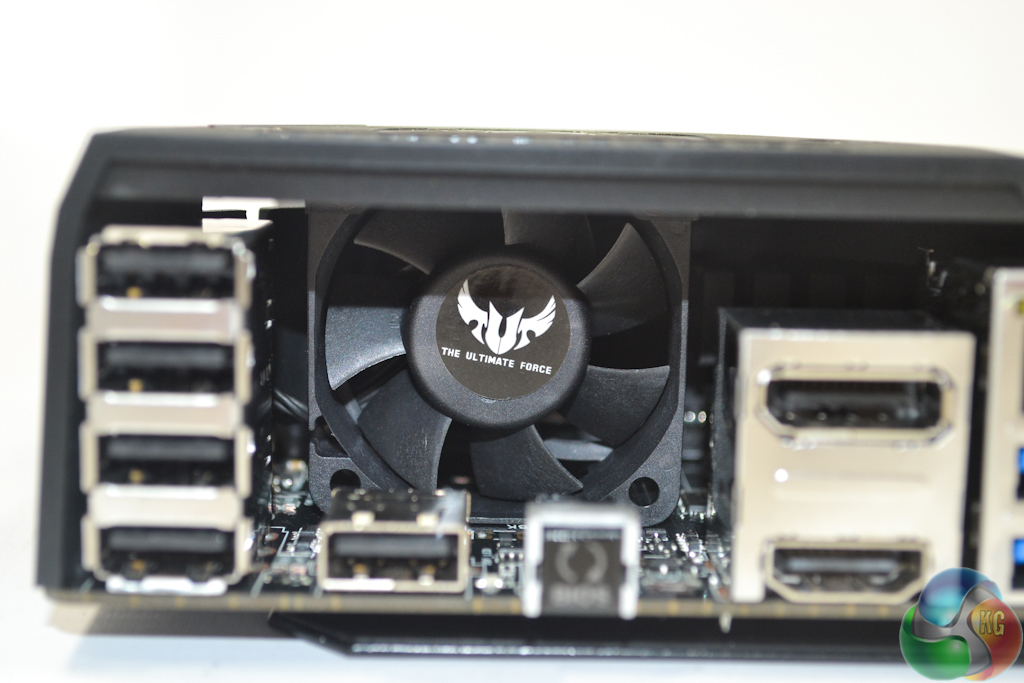
Slotting this fan back into position allows the VRM heatsinks to be fed with clean, cool air.
By default, both of the motherboard fans get extremely loud when a full load is applied. There are, however, functions in the UEFI and OS software to control their operating speed and characteristics.

Removing the Thermal Armor shaped plastic covering is straightforward. Despite being a relatively simple procedure, one's CPU cooler and graphics card will have to be removed meaning that cleaning below Thermal Armor will require an entire system strip-down. Potentially splitting Thermal Armor into two discrete sections would aid the simplicity at which the lower half can be removed for periodic cleaning.
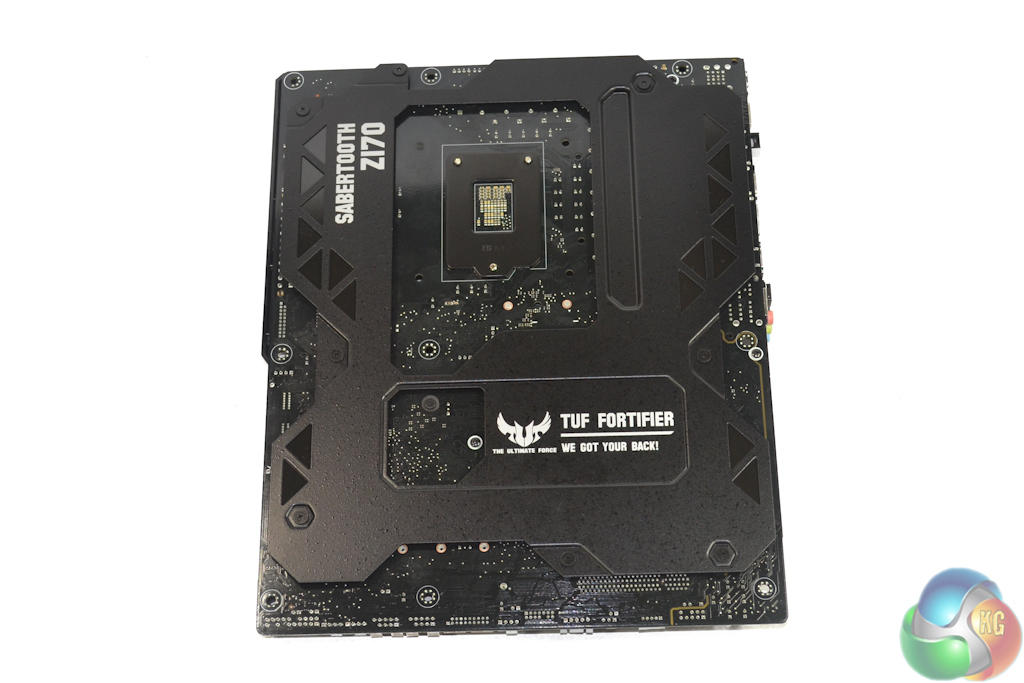
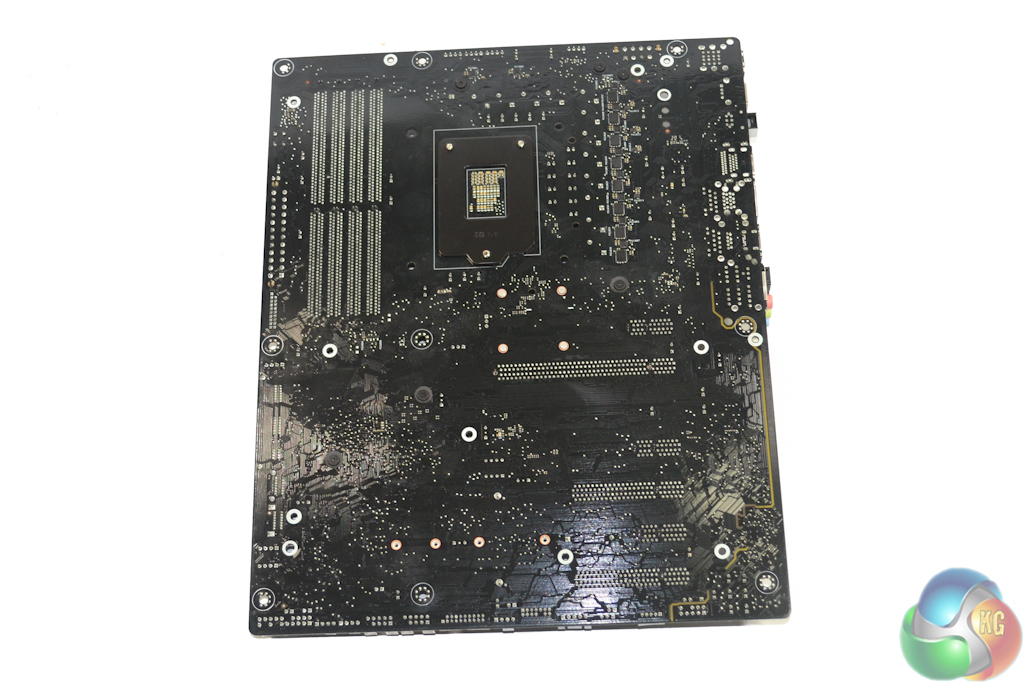
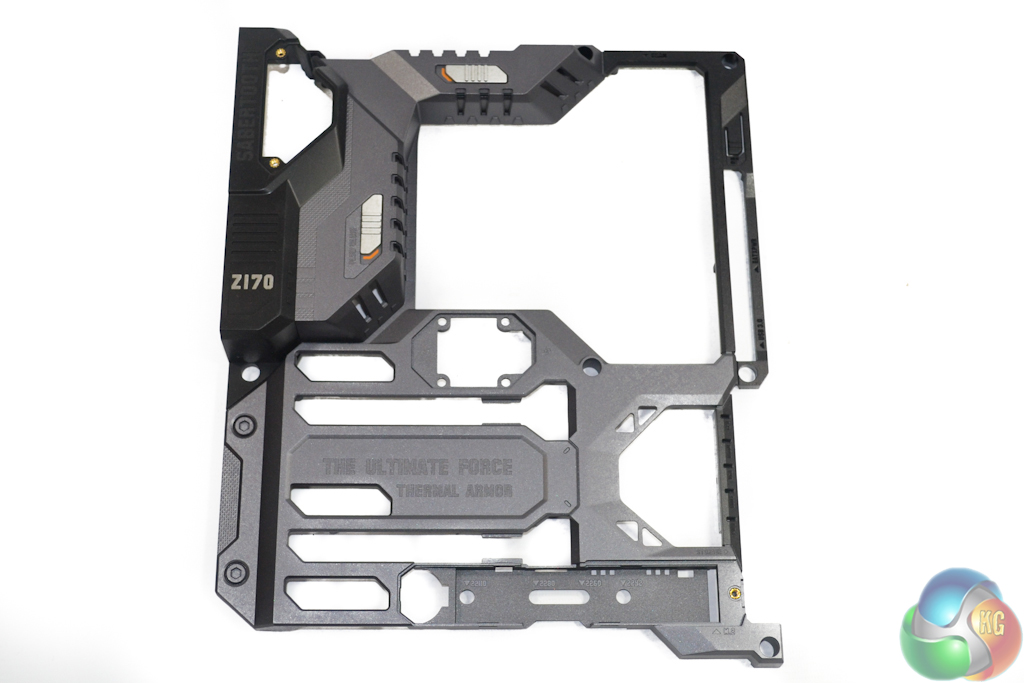
Asus' metal – TUF Fortifier – backplate is used to enhance motherboard rigidity and it does so very well. While its function may not be so apparent at first thought, having a heavy air cooler hanging from the CPU socket creates a large amount of bending stress on the motherboard's PCB. The metal plate helps to increase the motherboard's stiffness, thus reducing the strain caused by a heavy CPU cooler.
A thermal strip also draws heat away from a set of rear-mounted MOSFETs and transfers it to what is effectively a large metal heatsink.
Asus Z170 UEFI
Firstly, we are pleased to report that our NZXT Avatar S and generic wireless mouse worked correctly in the Asus Z170 UEFI. We’ve found our NZXT Avatar S to be the most troubling mouse with UEFI support, so when it functions correctly in the interface, that is usually a good sign for overall mouse support.
Note: Asus' UEFI is almost identical across the Z170 line-up. As such, many of the screenshots from our review of Asus' Maximus VIII Hero motherboard are reused.
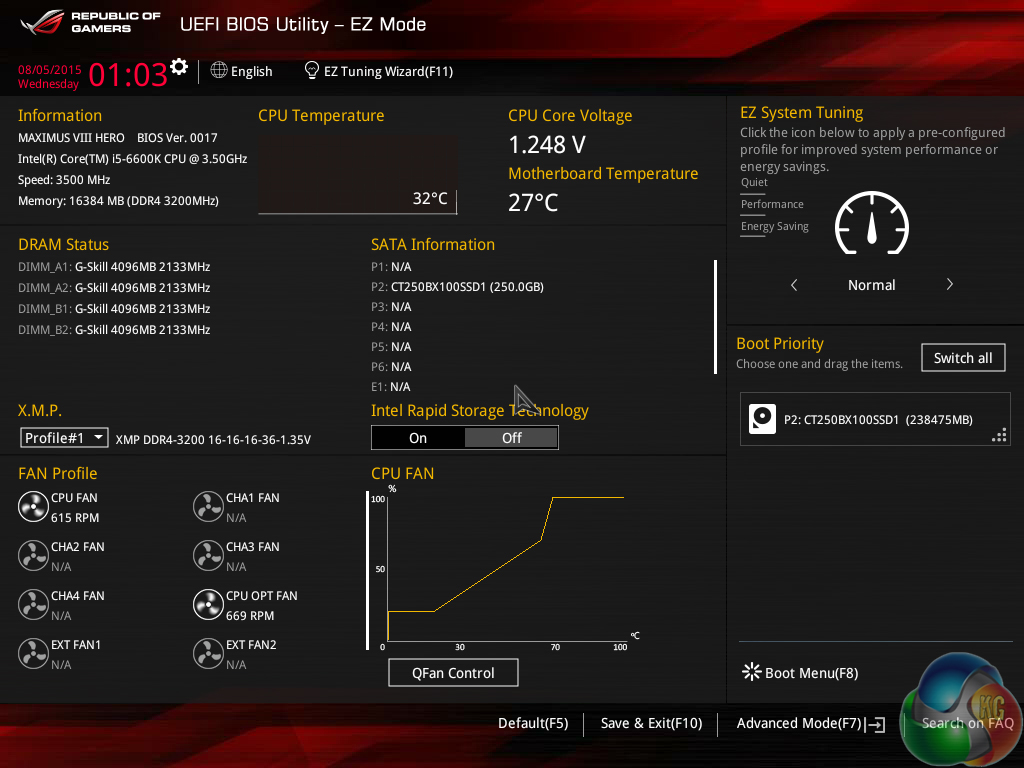
Opening up the UEFI leads to an entry page that displays a broad set of basic system information. From here, less experienced users can adjust boot device priority and fan speed settings without having to make the sometimes daunting step of delving deeper into the UEFI.
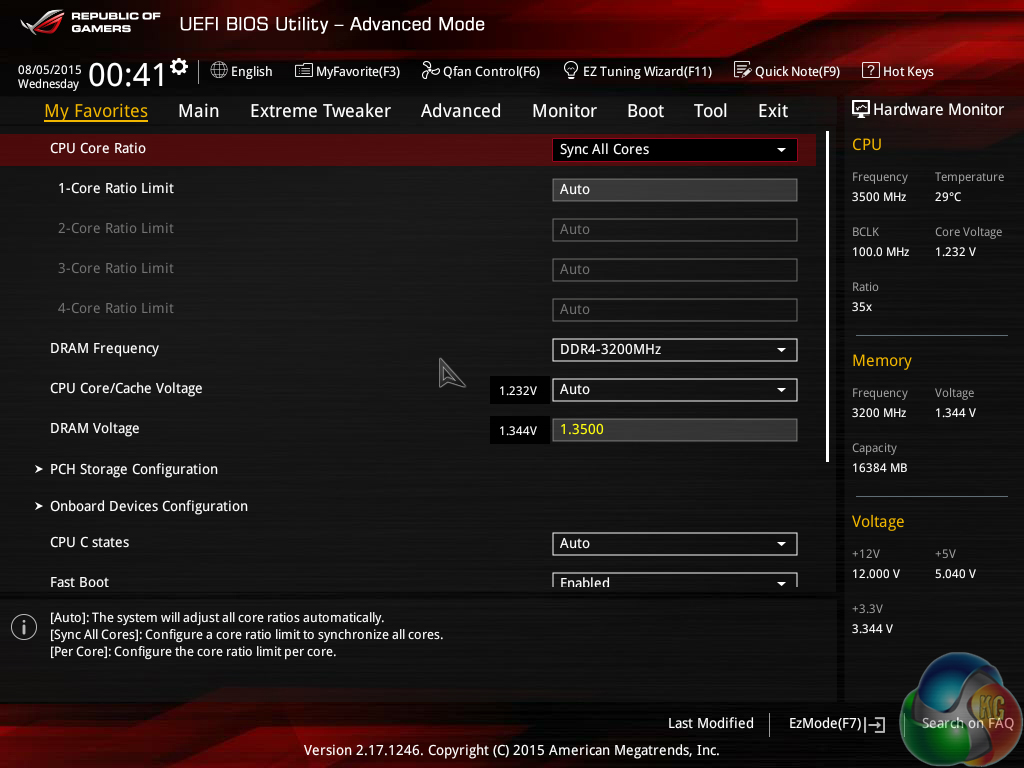
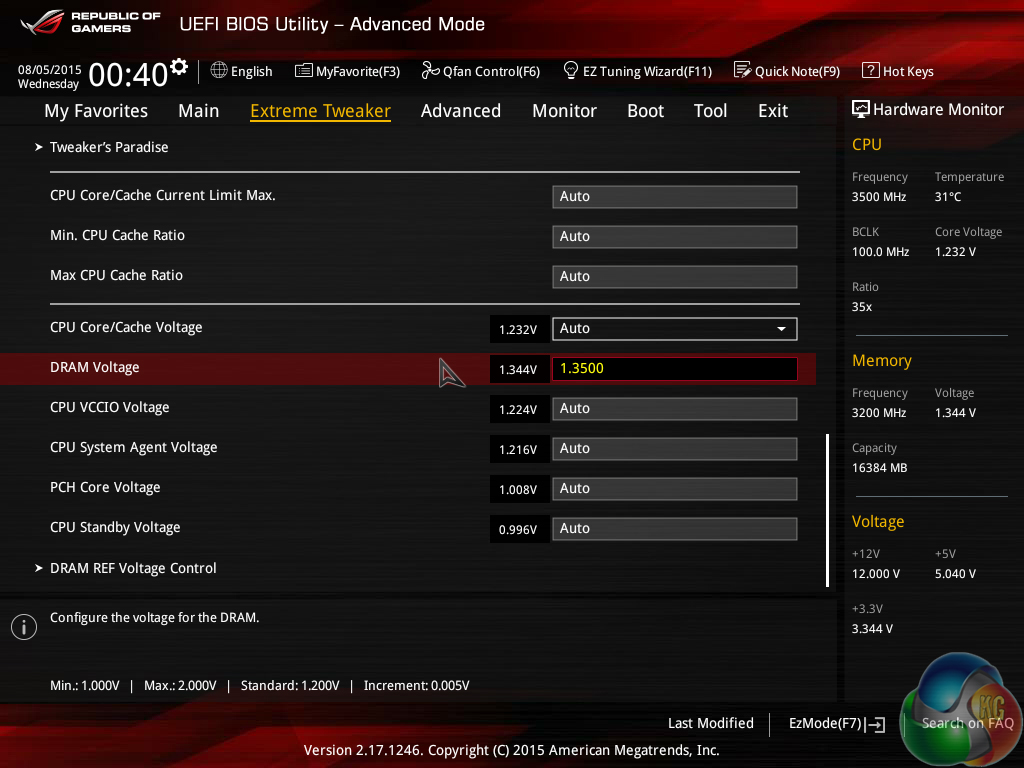
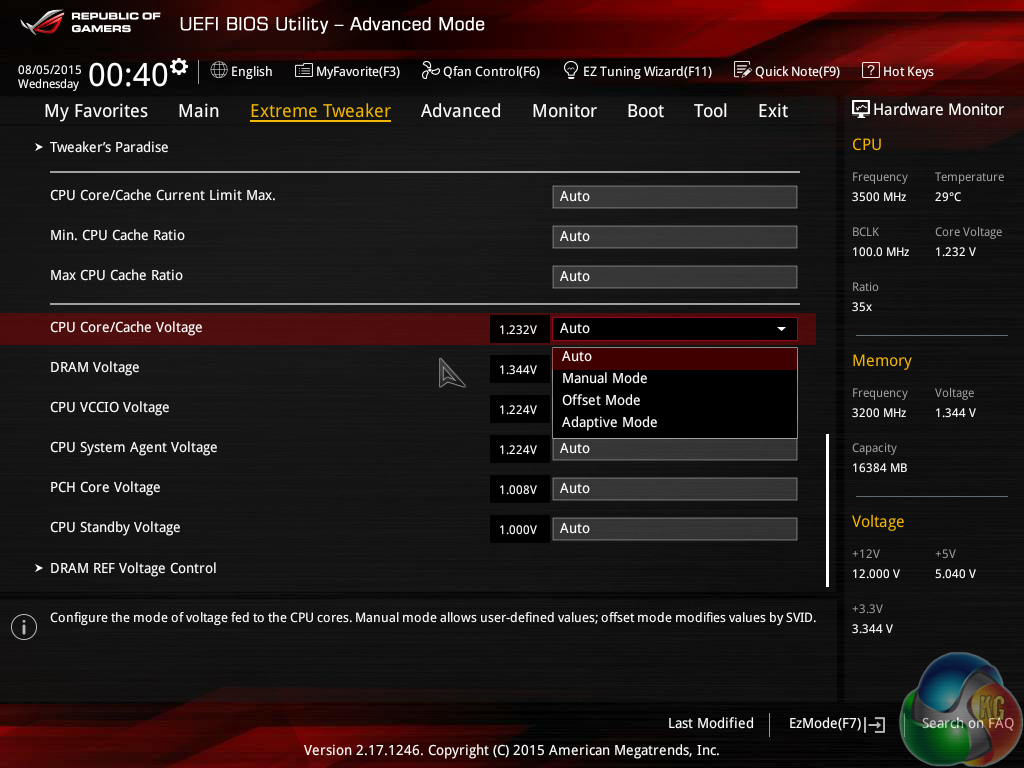

AI Tweaker (as it is called in the standard Asus Z170 UEFI) follows the standard layout that we have come to expect from recent Asus motherboards, and that’s a good thing. Easy access is provided to ratio, frequency, and voltage settings, allowing users to adjust their system parameters with minimal effort.
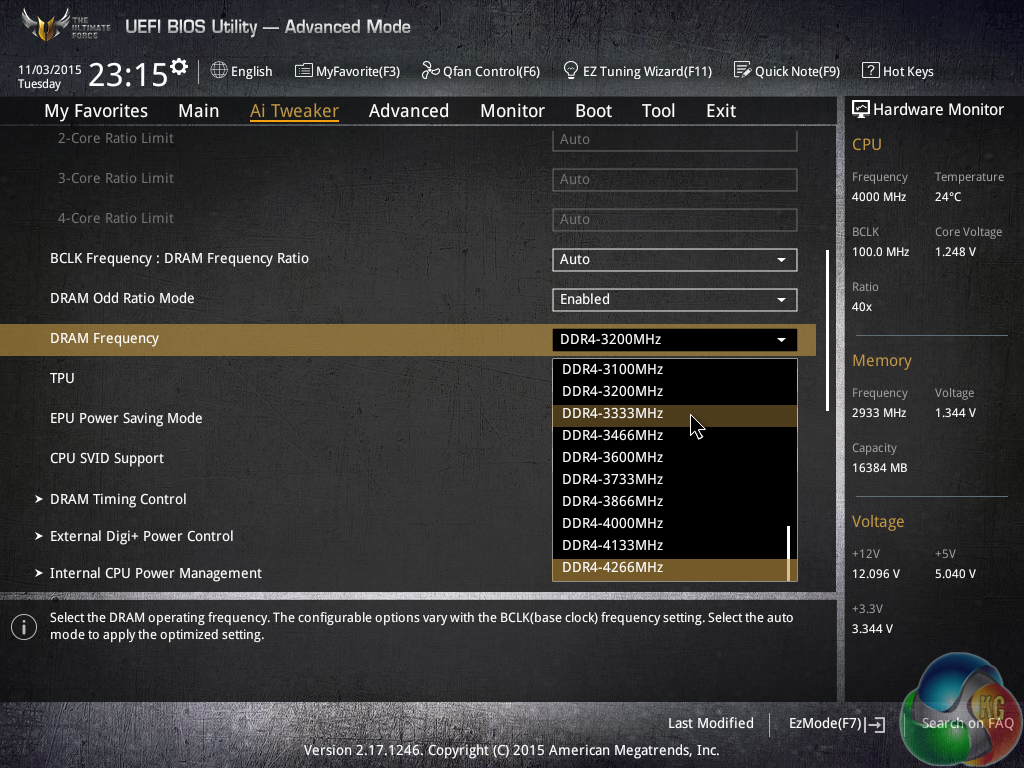
Dividers for DRAM frequencies up to 4266MHz can be selected.
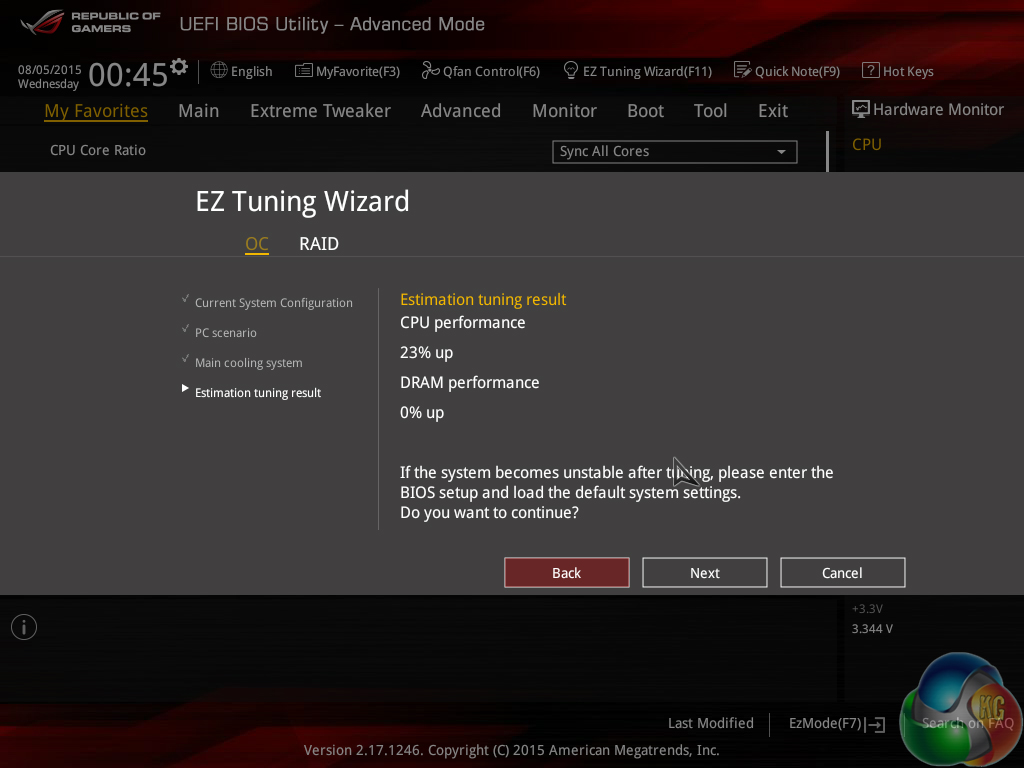
There is the EZ Tuning automated overclocking tool that can be relied upon for straightforward frequency boosts.
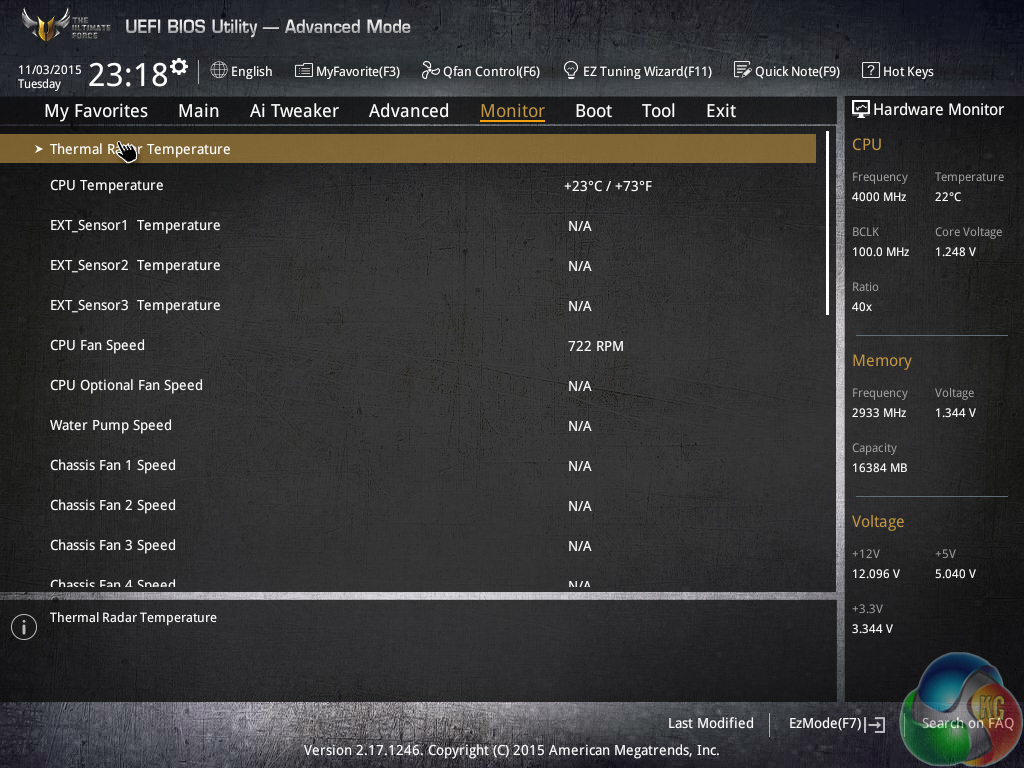
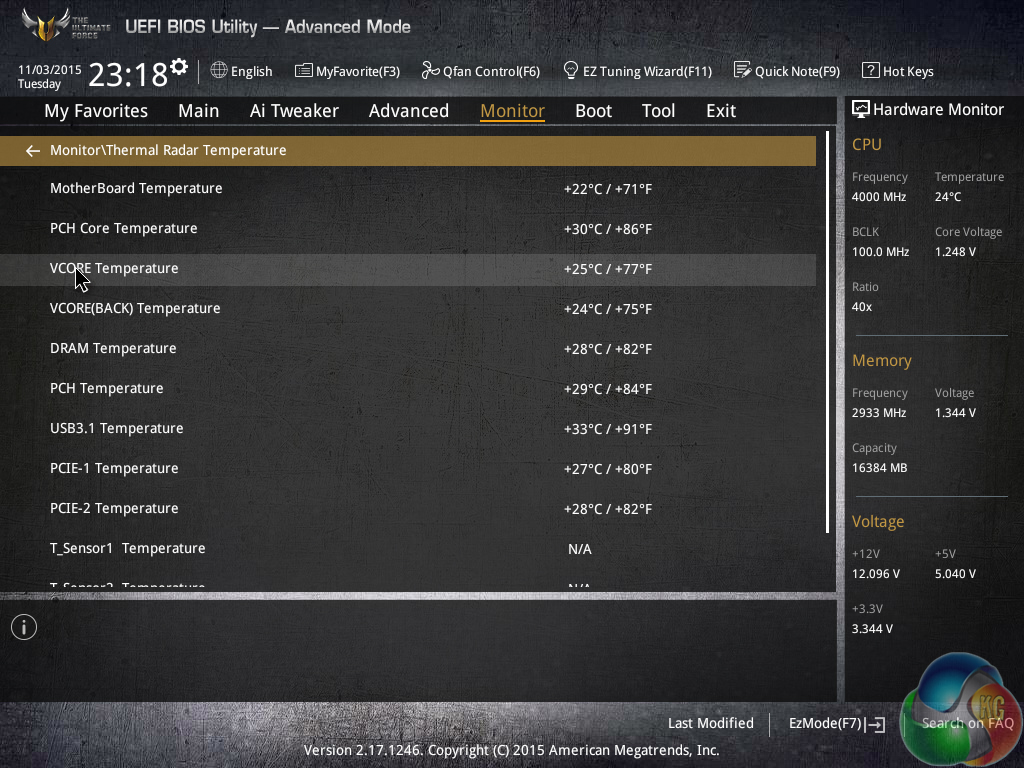
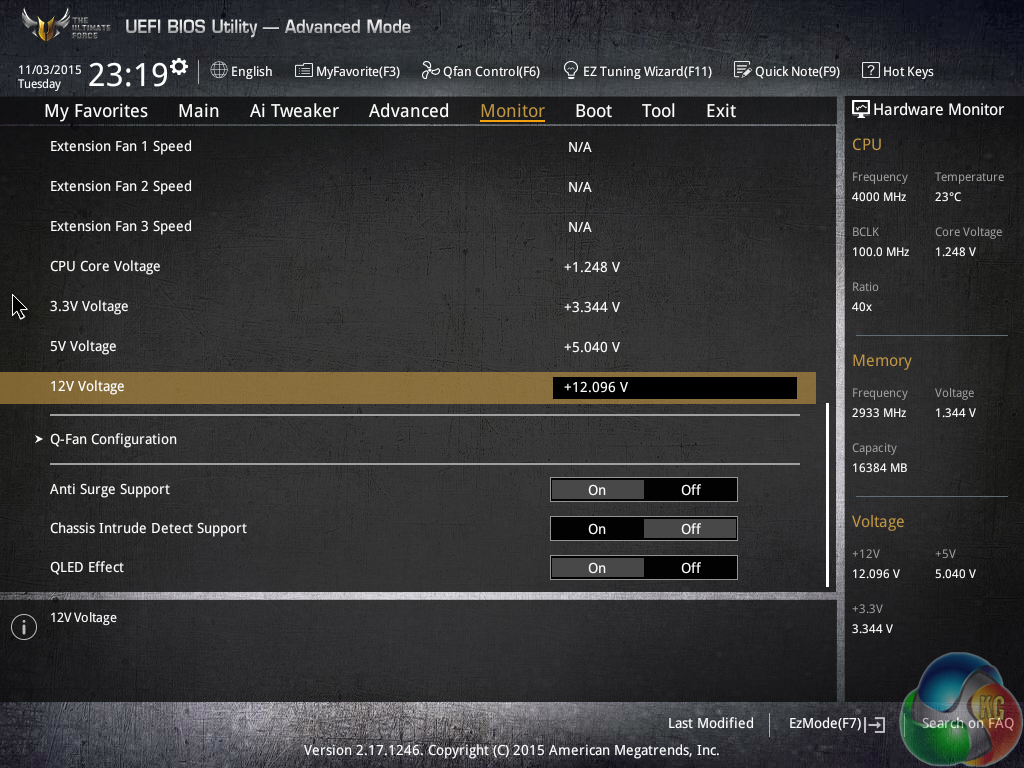
An array of voltages, temperatures, and fan speeds can be monitored in the UEFI.
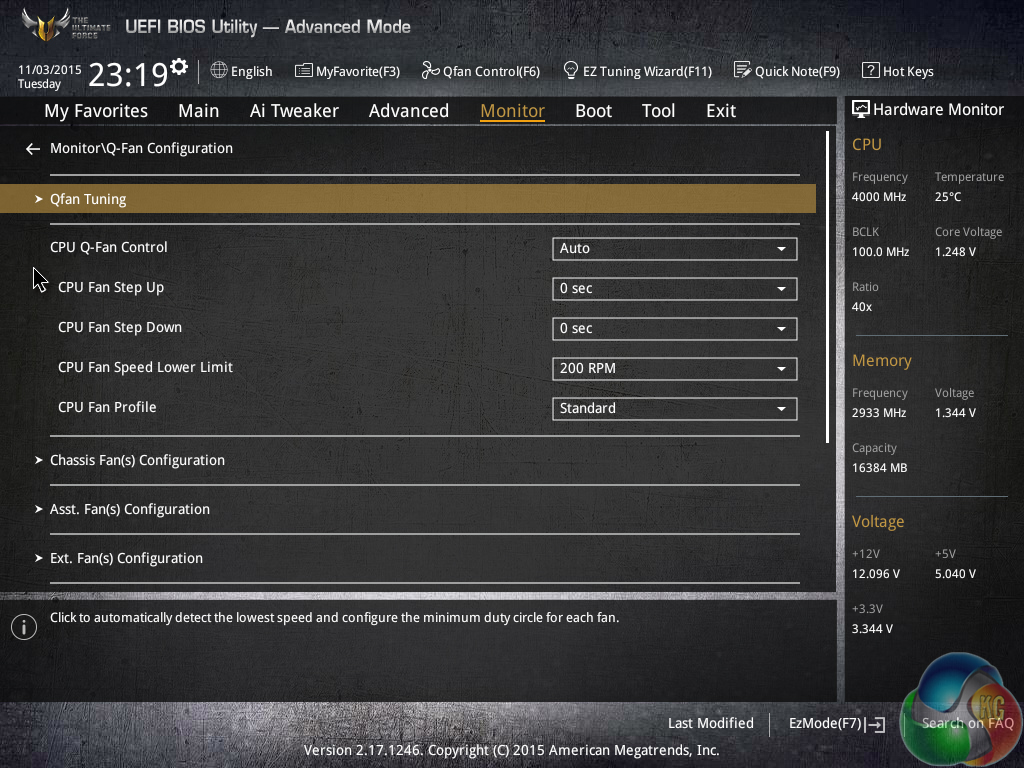
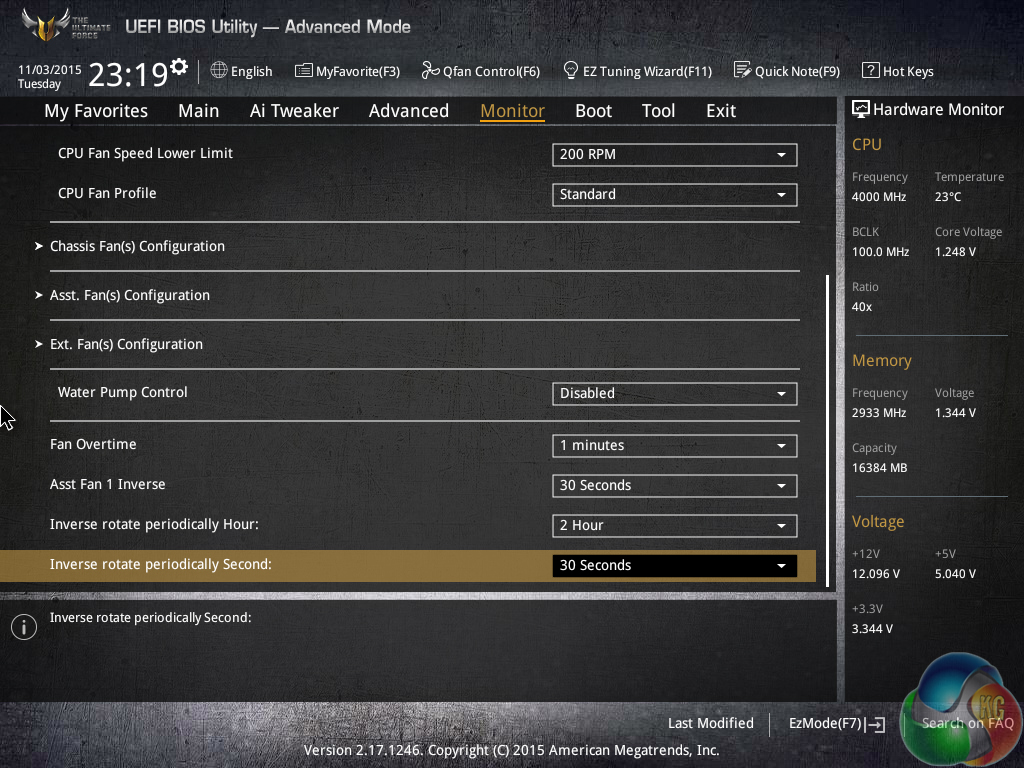
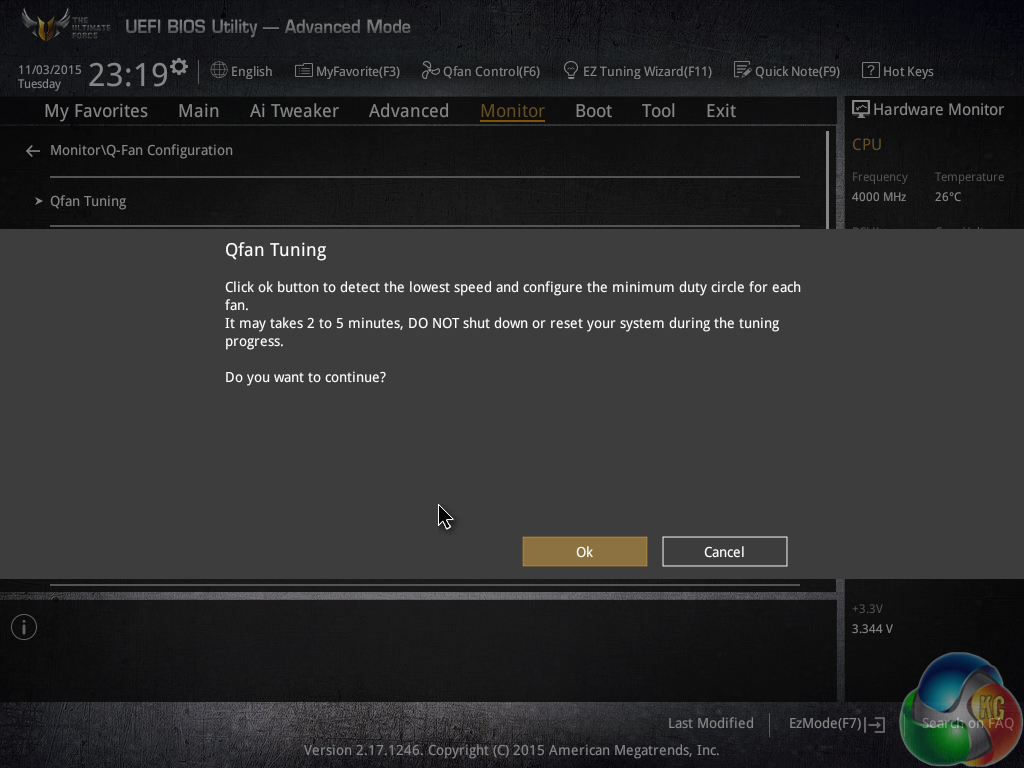
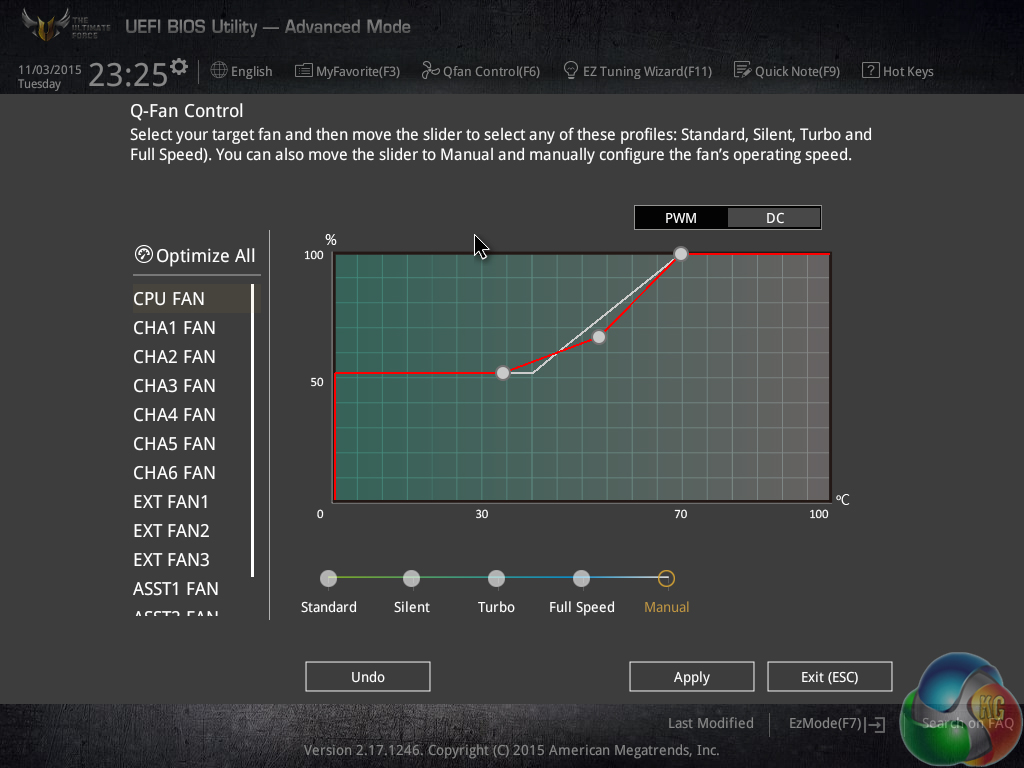
Asus gives the UEFI its usual level of flexibility regarding fan speed tweaking. The Q-Fan Tuning utility gives users a graphical display from which they can adjust speed against temperature settings and there's also an automated configuration tool.
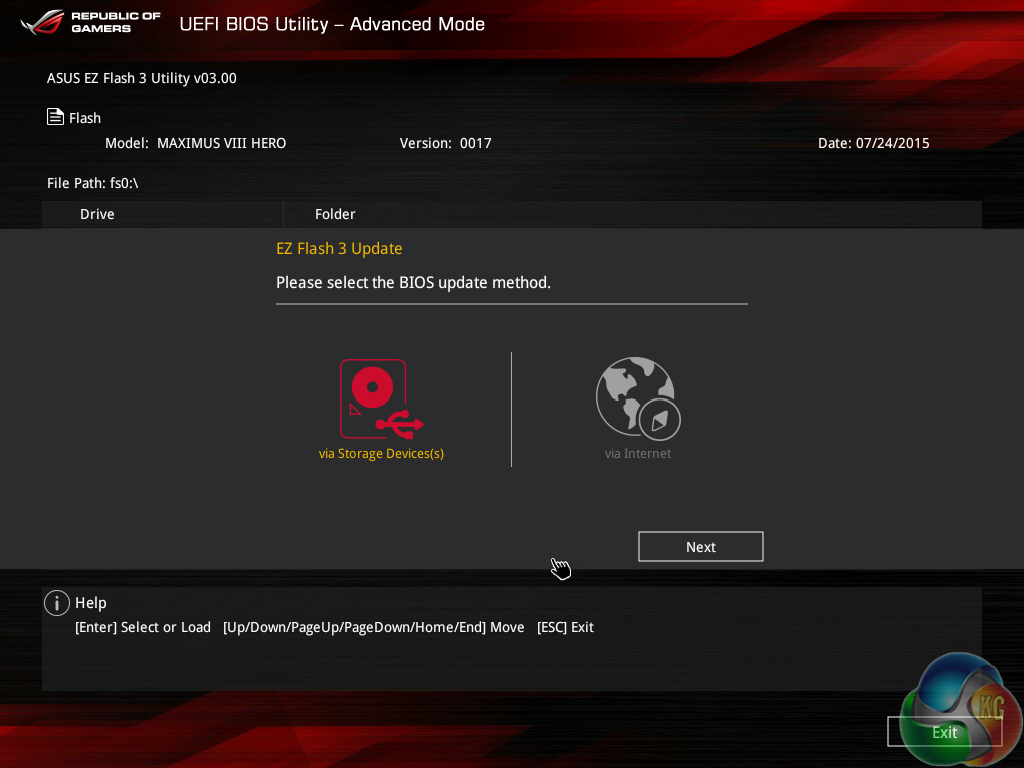
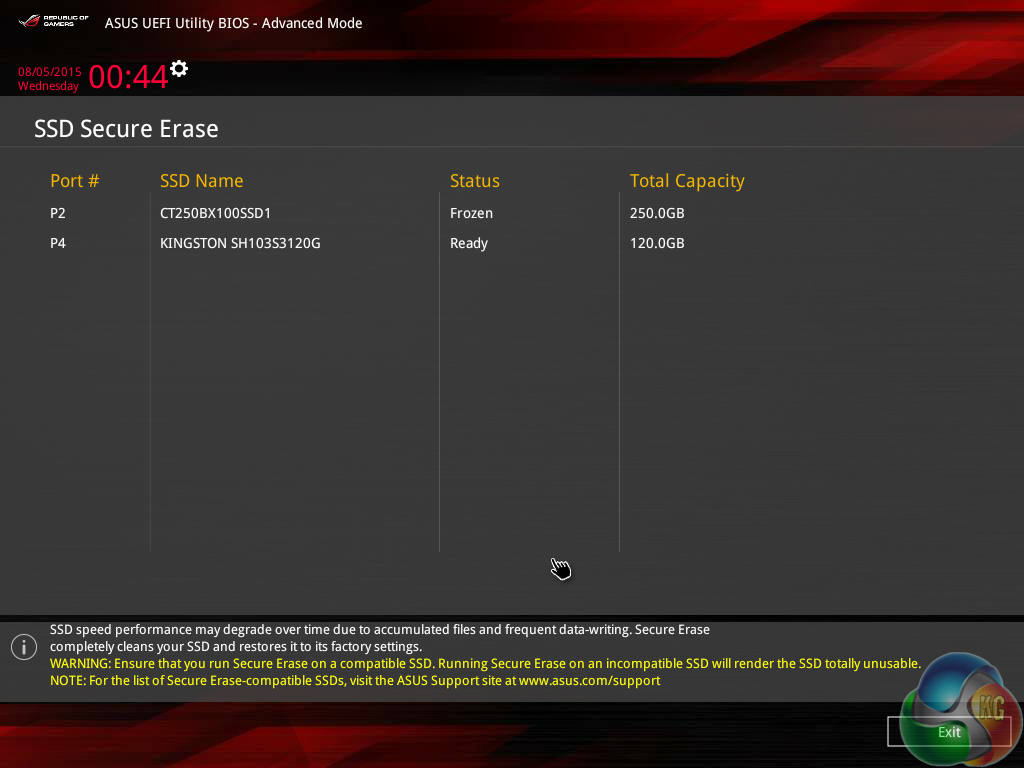
Asus’ usual set of tools is supplied in the UEFI, including the convenient Secure Erase. Users can route through a drive to look for a BIOS update file.
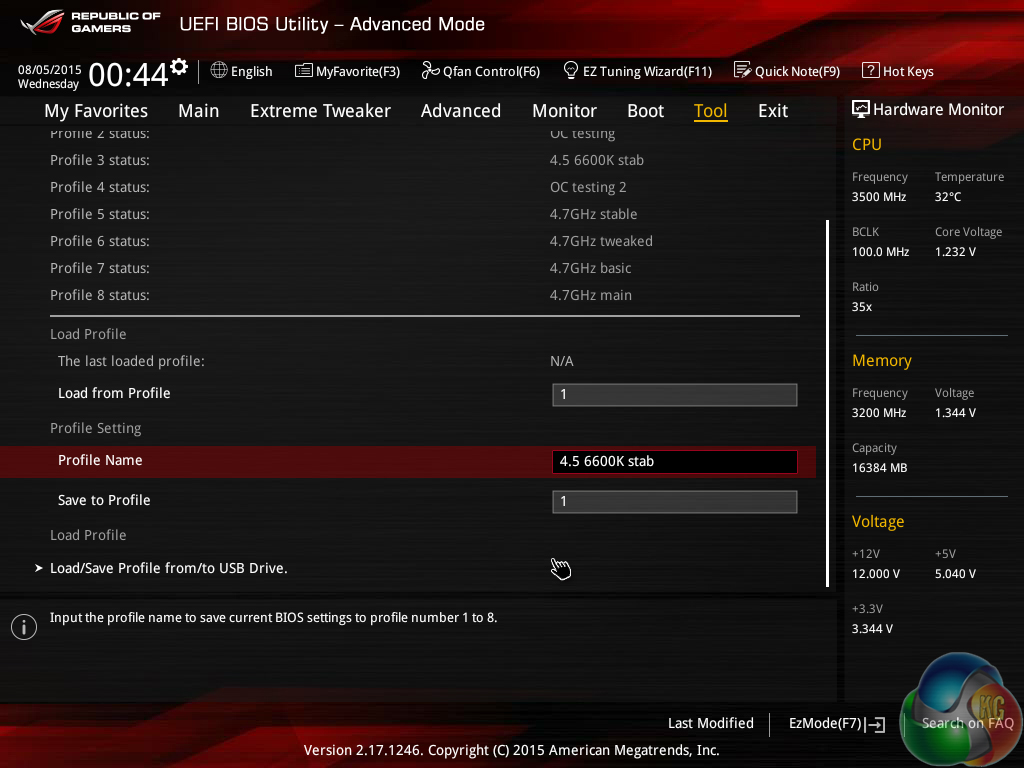
Up to eight settings profiles can be saved, named, and transferred.
The Asus Z170 UEFI is practically identical to that used on the Z97 and Z170 ROG motherboards. It follows Asus’ tried-and-tested interface layout and styling, and that’s a good thing. The interface is easy to navigate, plenty of options are provided, and the appearance is good to look at.
We have no complaints regarding the Z170 UEFI. Not even the comparatively low 1024×768 resolution can be registered as a negative because Asus manages to display a relevant amount of information on each frame without making the screen full of confusion.
Software
The AI Suite 3 installation for Asus' Sabertooth Z170 Mark 1 motherboard was almost identical to that found on Asus' ROG motherboards when used with our Windows 7 test system.
We actually found the software suite to be quite unstable on our installation – we saw at least ten crashes throughout testing and sometimes during gaming or benchmark runs (which causes interference).
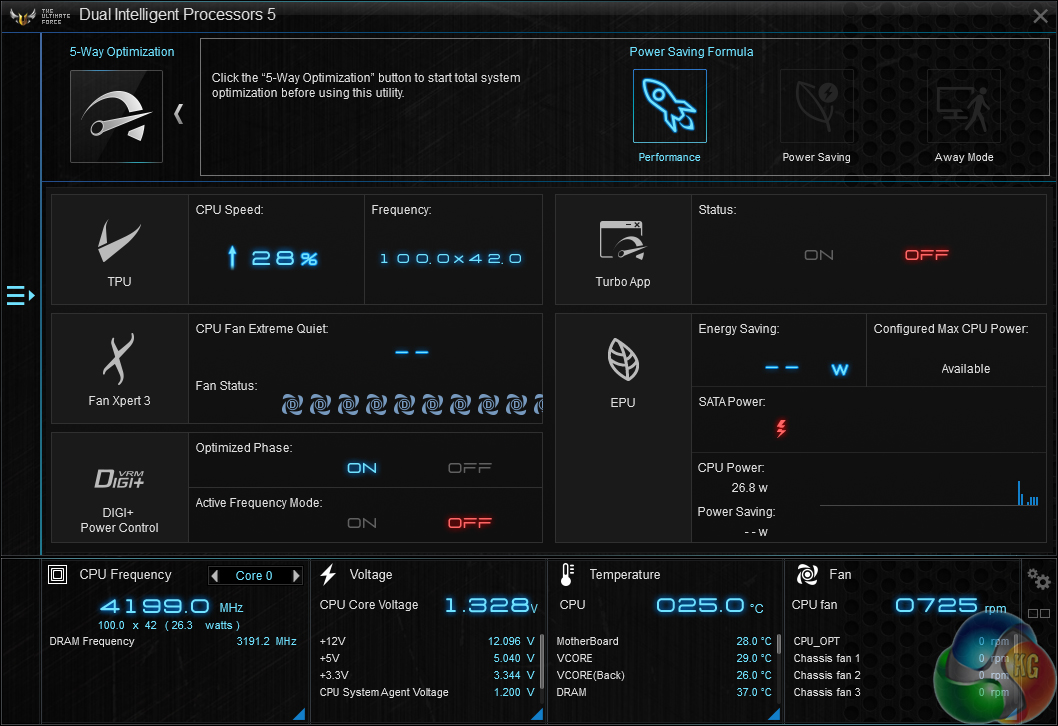
Asus’ AI Suite 3 software is very good. A strong array of voltage, frequency, and power settings can be adjusted via the software.
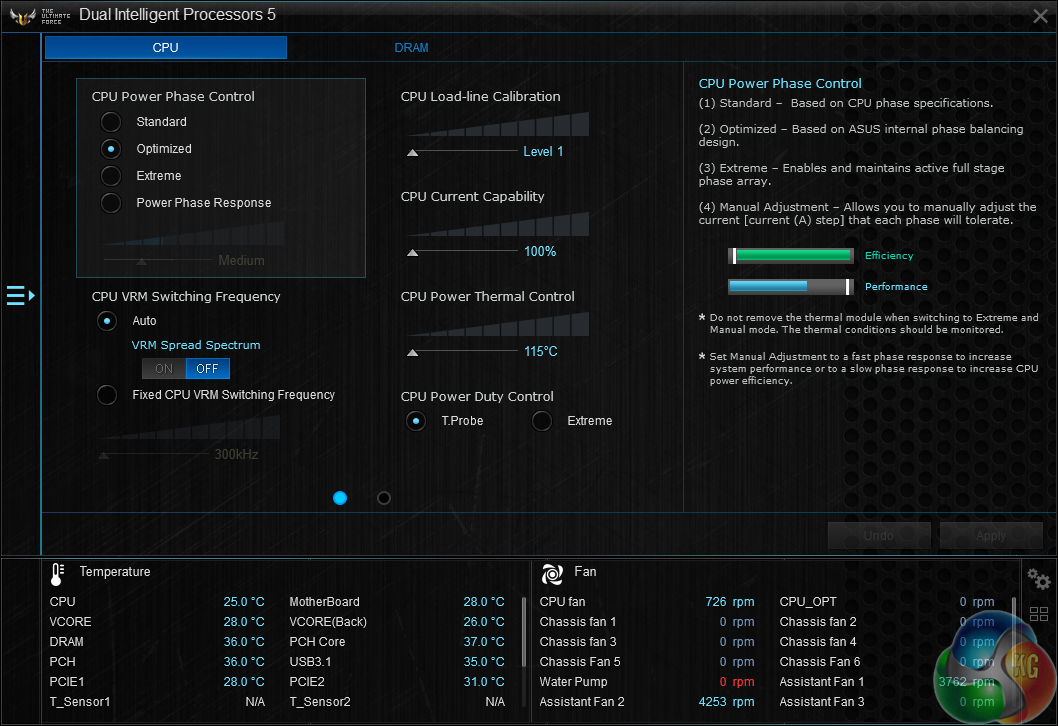
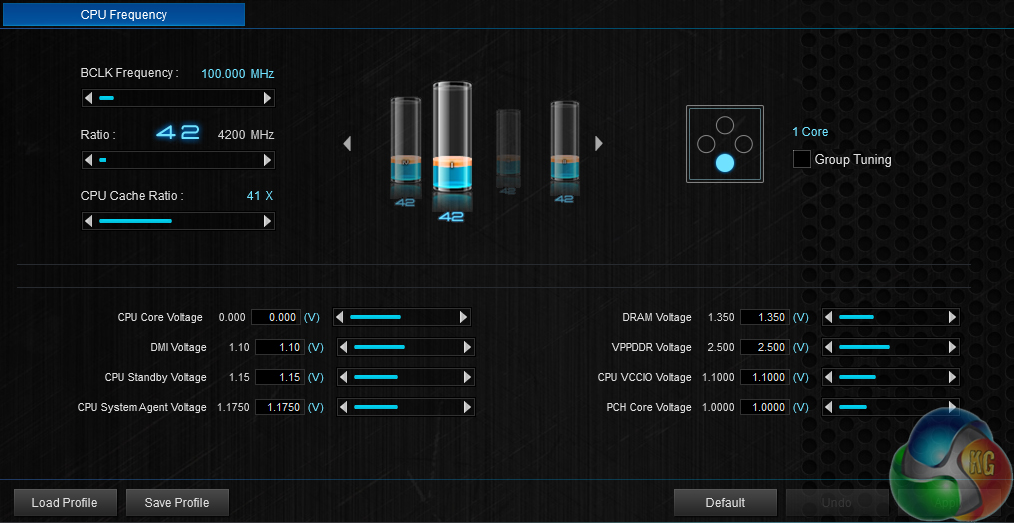
Further adjustments can be made in various parts of the software.
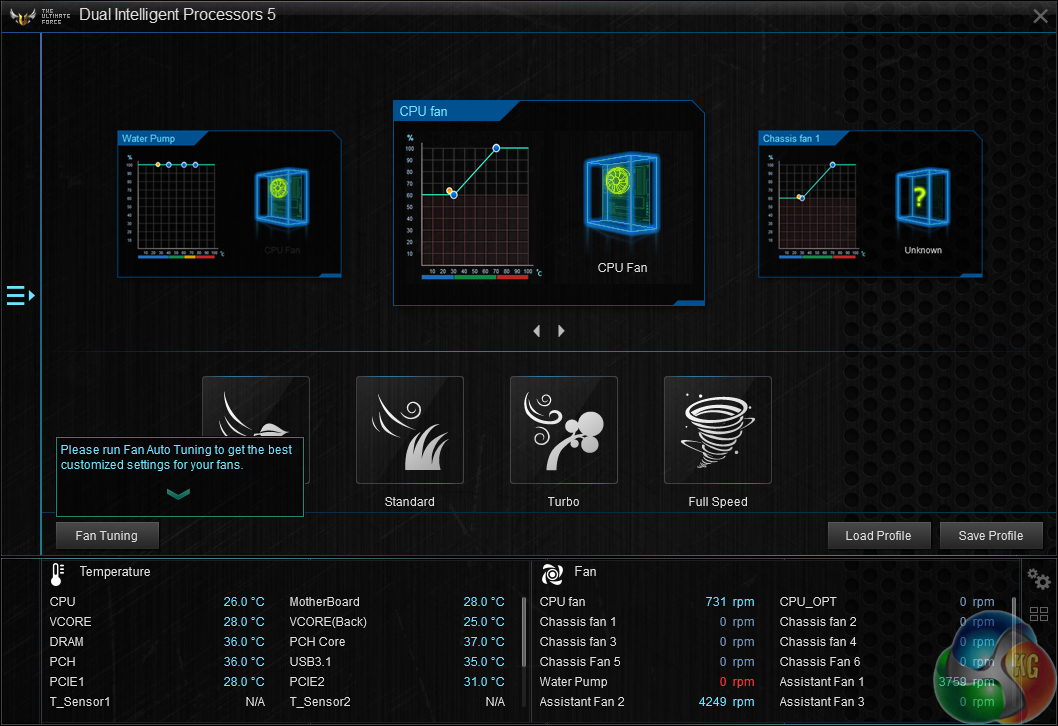
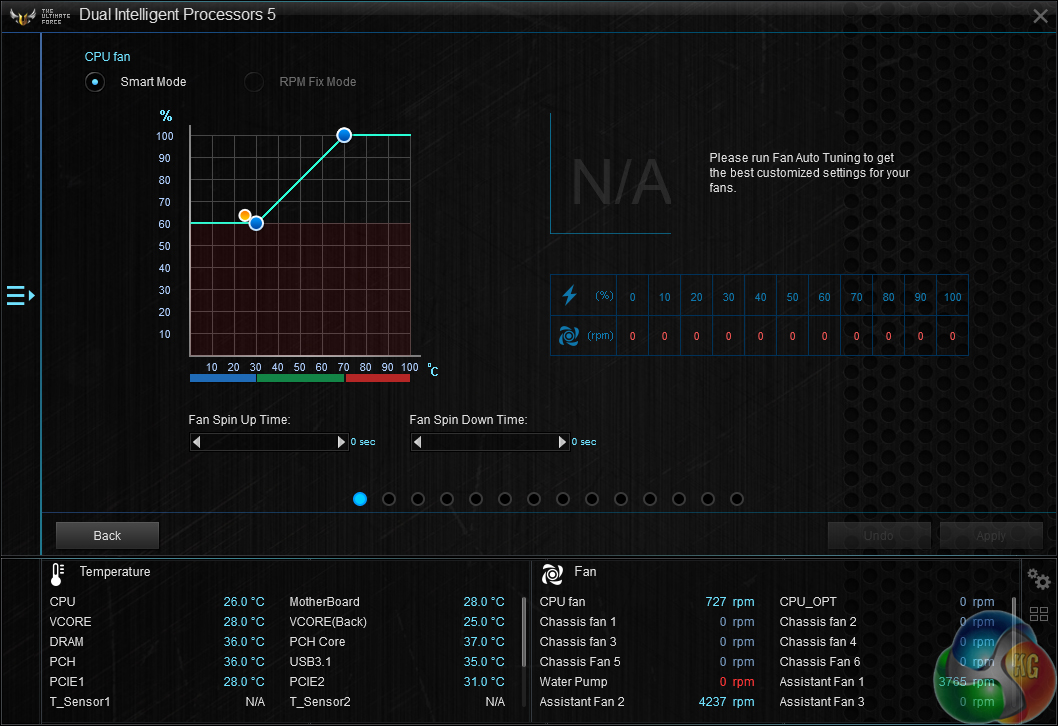
Fan control is handled via a separated section. The input methods are similar to those found in the UEFI.
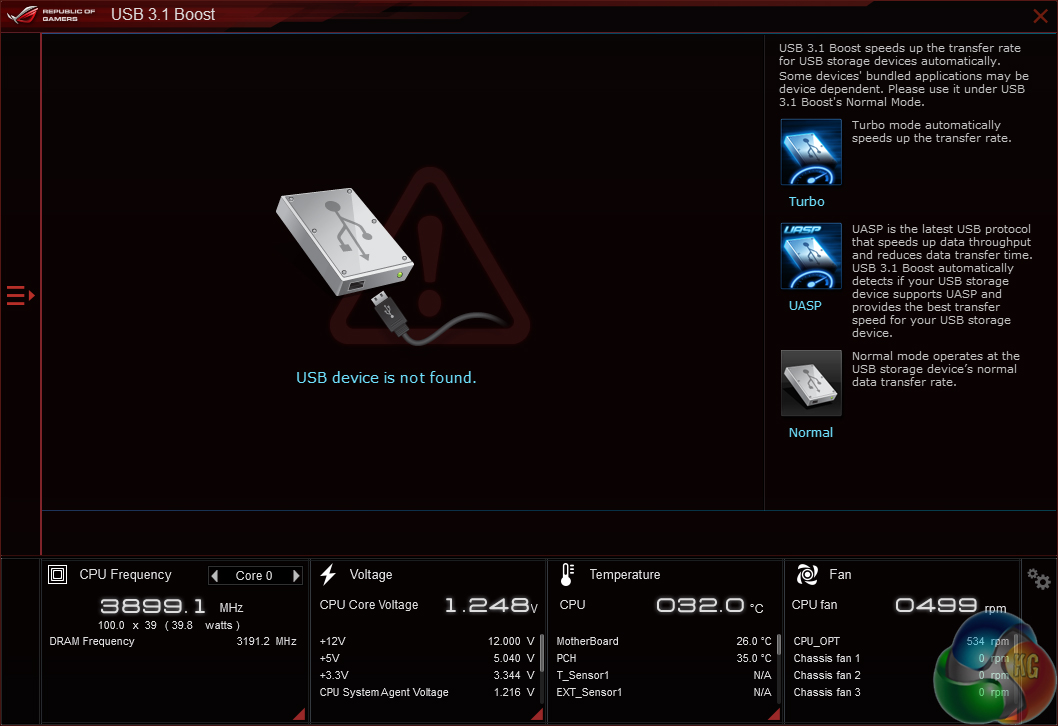
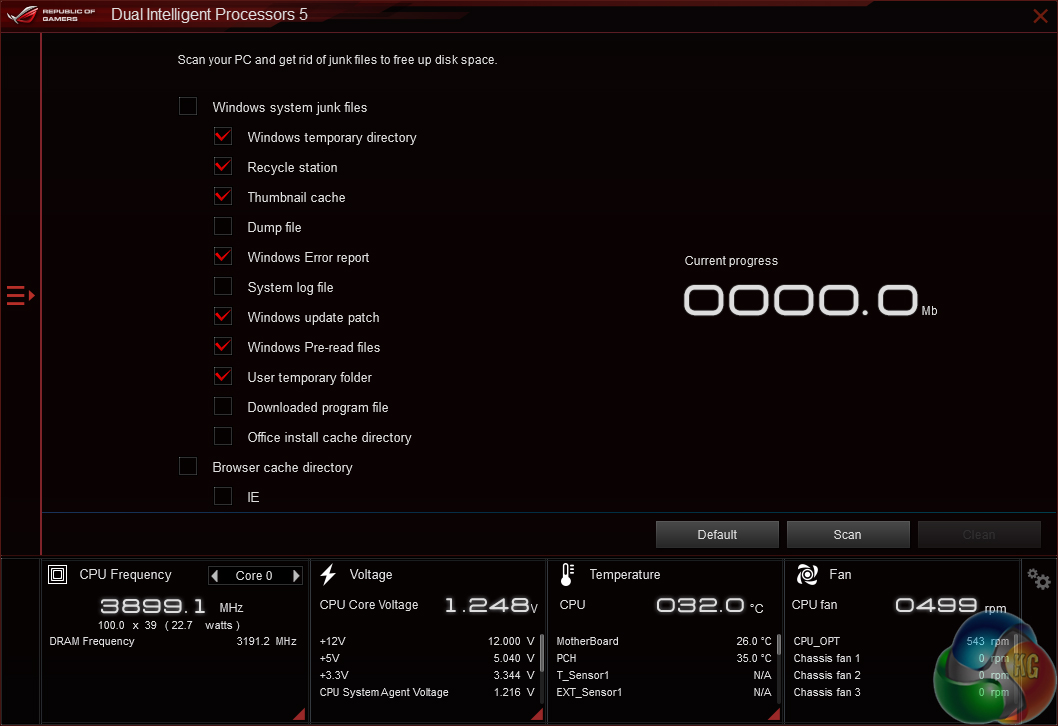
There are also supporting applications that allow enhancing of USB drive speeds and cleaning of OS operations.
Asus' Sabertooth Z170 Mark 1 is also compatible with other OS-based software, a variety of which we examined in the X99 version's review here.
Intel's Skylake processors are just the latest Intel CPU architecture to see many of the critical system operations handled by the processor. As such, benchmarking a motherboard becomes more of a test to certify that the part operates correctly and meets the anticipated performance levels.
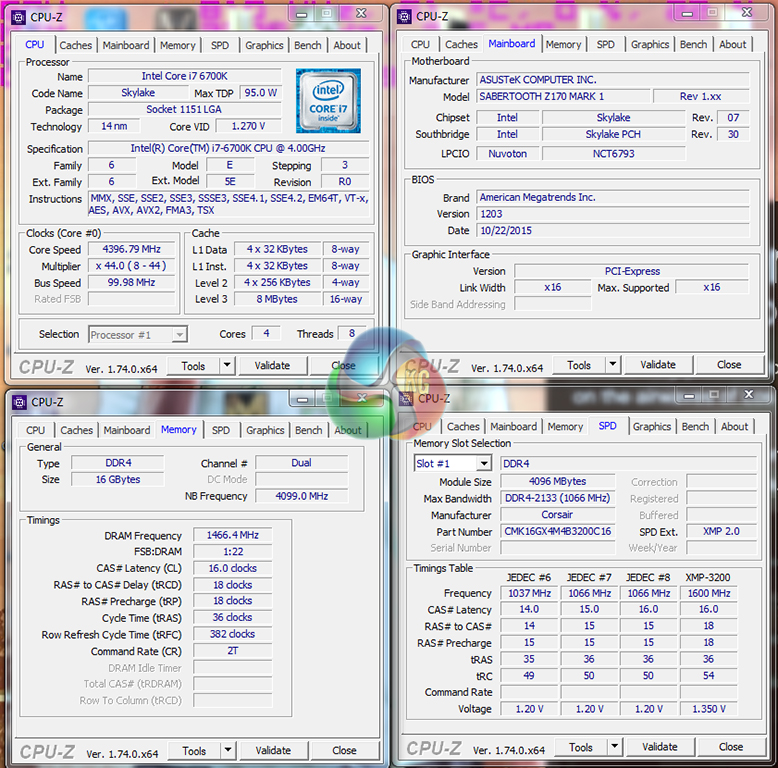
We will be outlining the Asus Sabertooth Z170 Mark 1 motherboard's performance with the Core i7-6700K CPU at its stock frequency (4.2GHz due to forced turbo). Overclocked performance will be outlined later in the review.
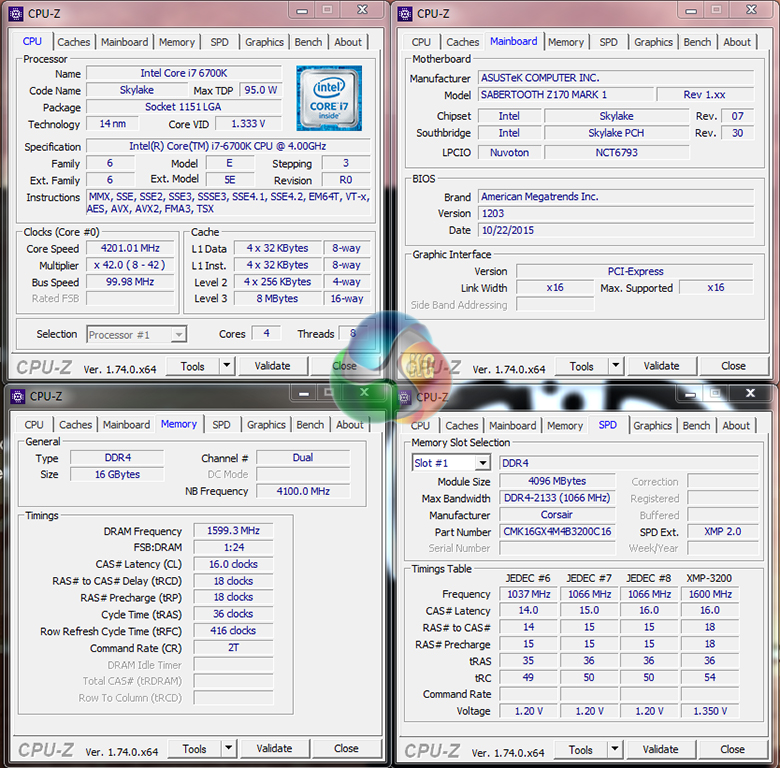
The Asus Sabertooth Z170 Mark 1 motherboard allows users to apply multi-core turbo (MCT) and force the 6700K to a constant 4.2GHz when XMP is enabled. This will be displayed as the ‘stock’ setting.
Z170 Motherboard Test System:
- Processor: Intel Core i7-6700K (4.2GHz forced turbo).
- Memory: 16GB (4x4GB) Corsair Vengeance LPX 3200MHz 16-18-18-36 DDR4 @ 1.35V.
- Graphics Card: Nvidia GTX 980 Ti.
- System Drive: 250GB Crucial BX100 SSD.
- CPU Cooler: Noctua NH-D14.
- Case: NZXT Phantom 630.
- Power Supply: Seasonic Platinum 1000W.
- Operating System: Windows 7 Professional with SP1 64-bit.
Compared Z170 Motherboards:
- ASRock Fatal1ty Z170 Gaming K6+.
- Asus Maximus VIII Hero.
- Gigabyte Z170XP-SLI.
- Gigabyte Z170X-Gaming 7.
- MSI Z170A XPower Gaming Titanium Edition.
Software:
- Asus Sabertooth Z170 Mark 1 BIOS v1203.
- GeForce 353.30 VGA drivers.
Tests:
- Cinebench R15 – All-core CPU benchmark (System)
- HandBrake 0.10.2 – Convert 1.23GB 1080P game recording using the High Profile setting and MP4 container (System)
- 7-Zip 15.05 beta – Manual video archival (System)
- 3DMark 1.5.915 – Fire Strike Ultra (Gaming)
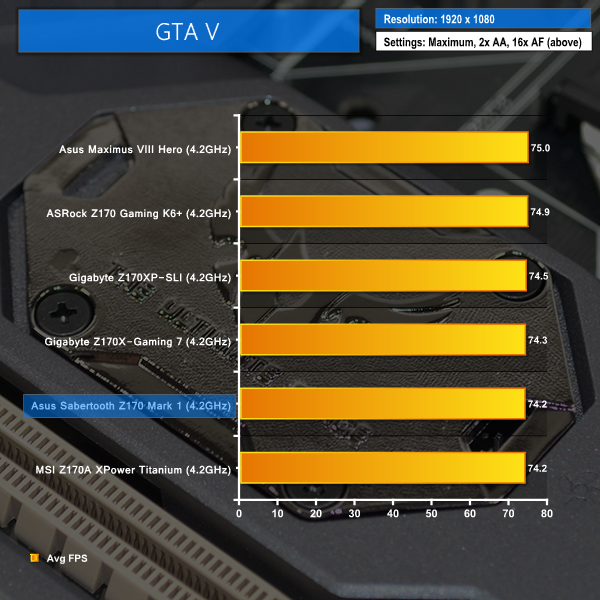
- Grand Theft Auto V – 1920 x 1080, near-maximum quality (Gaming)
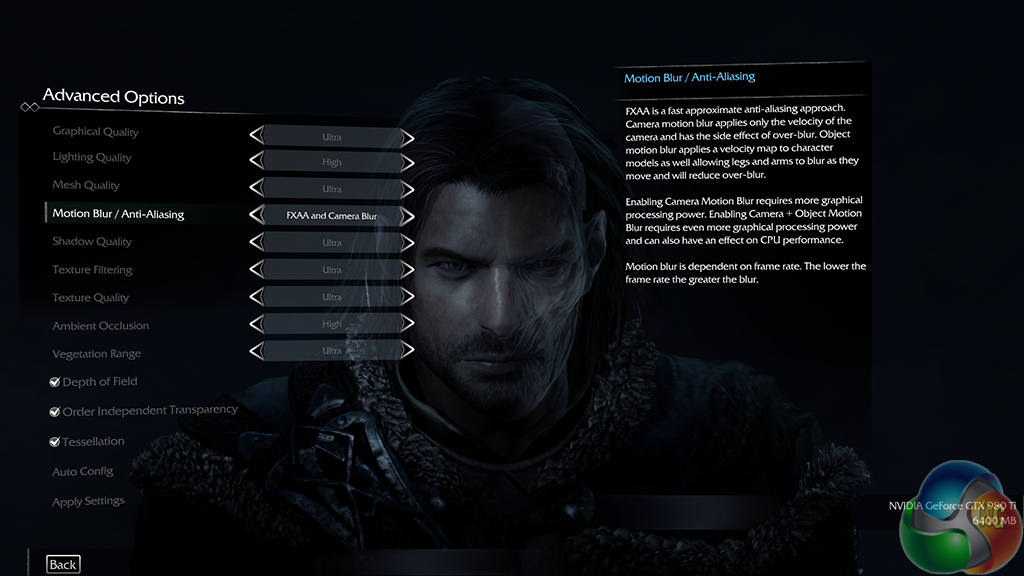
- Middle Earth: Shadow of Mordor – 1920 x 1080, ultra quality (Gaming)
- ATTO – SATA 6Gbps and USB 3.0 transfer rates (Motherboard)
- RightMark Audio Analyzer – General audio performance test (Motherboard)
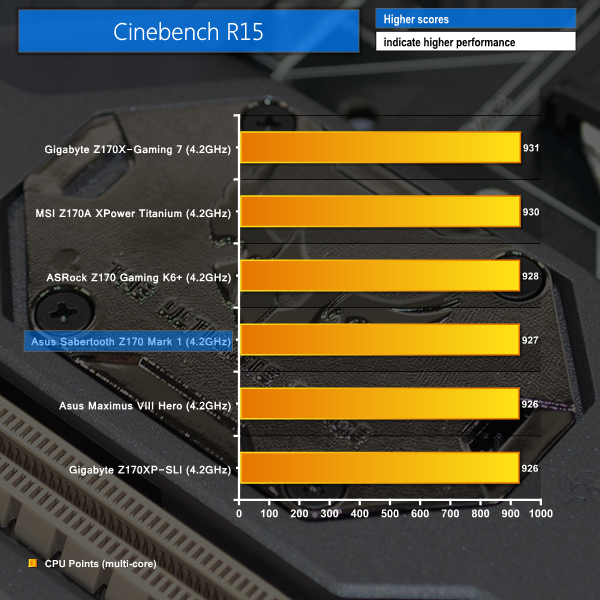
Cinebench
We used the ‘CPU’ test built into Cinebench R15 .
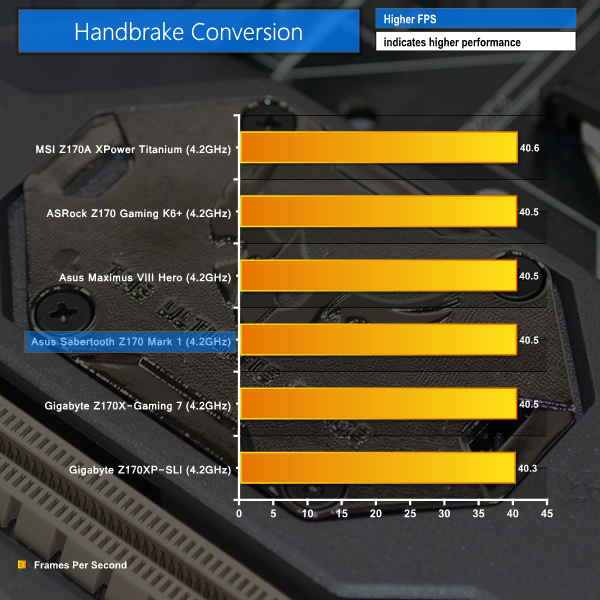
Handbrake Conversion
We measured the average frame rate achieved for a task of converting a 1.23GB 1080P game recording using the High Profile setting and MP4 container.
7-Zip
We manually archive a 1.23GB MP4 game recording to test the performance in 7-Zip.
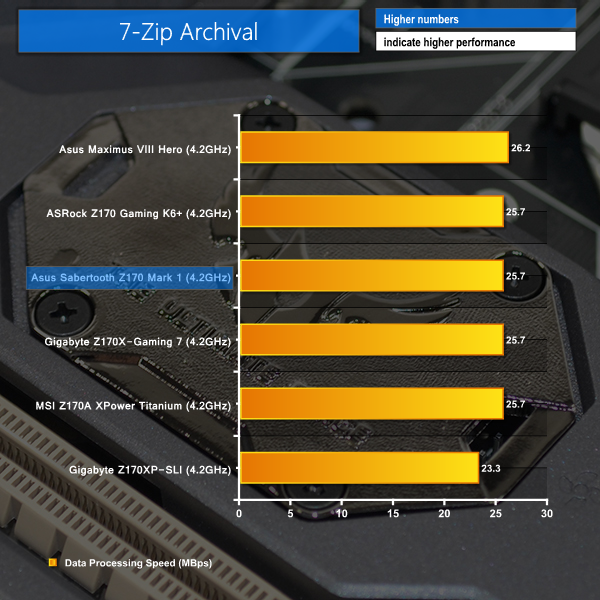
Asus' Sabertooth Z170 Mark 1 shows solid performance in our range of CPU-intensive tests. There's nothing to show that the Sabertooth has ground-breaking performance, but it isn't noticeably trailing its competitors either.
That's about as much as we could realistically wish for.
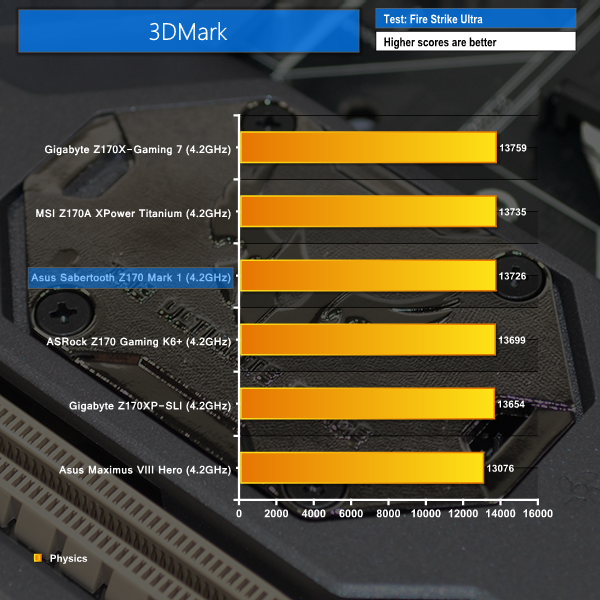
3DMark
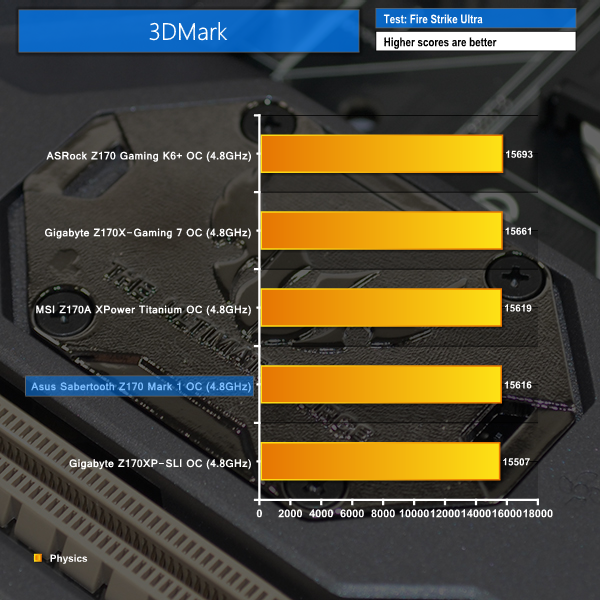
We used 3DMark‘s ‘Fire Strike Ultra’ benchmark which is designed to be used on high-resolution gaming PCs.
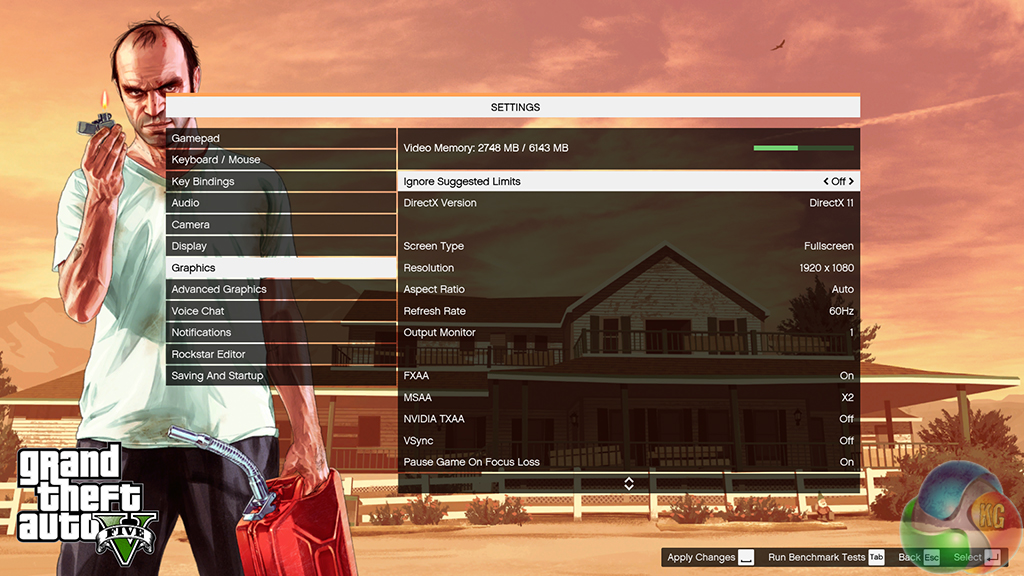
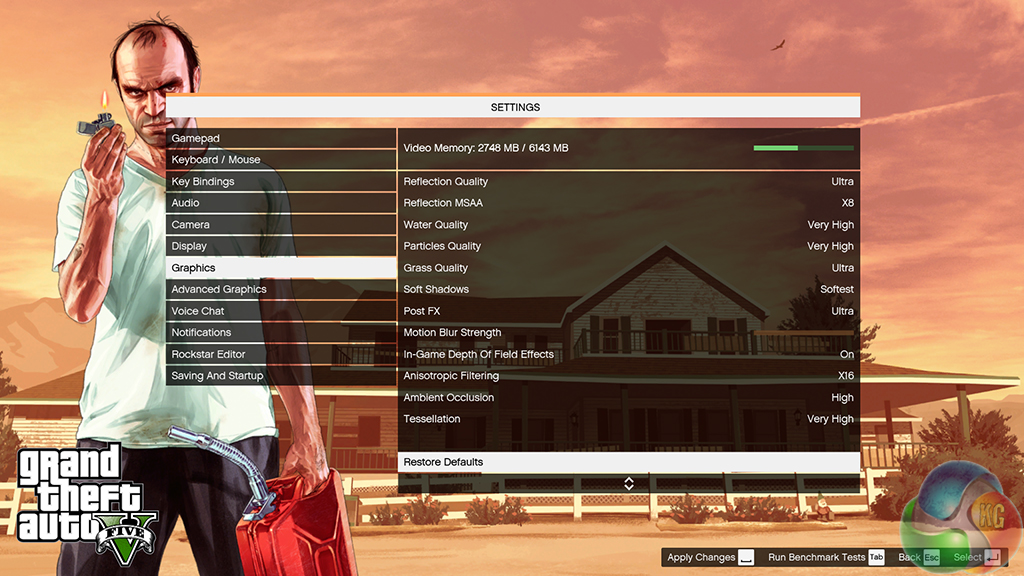
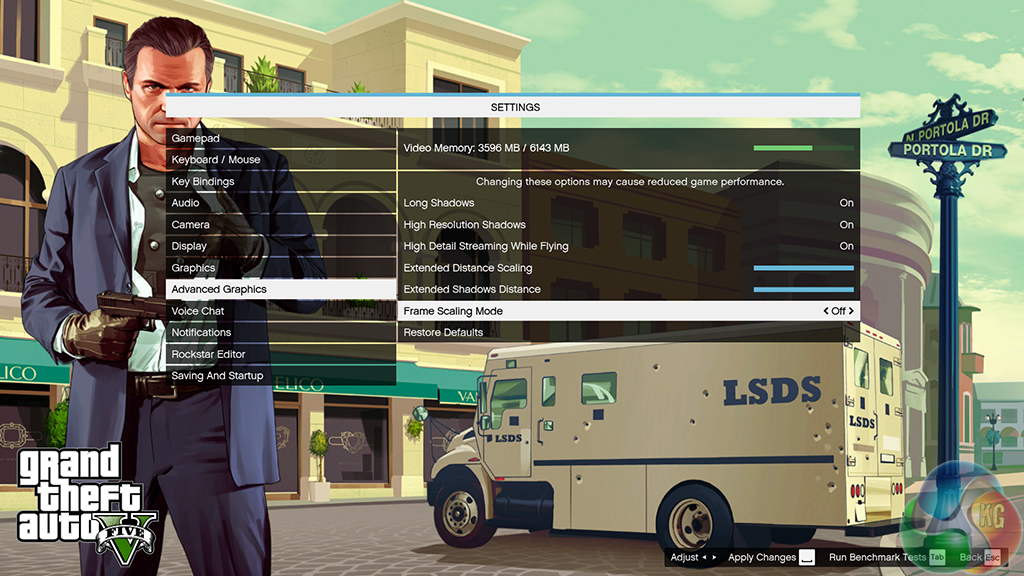
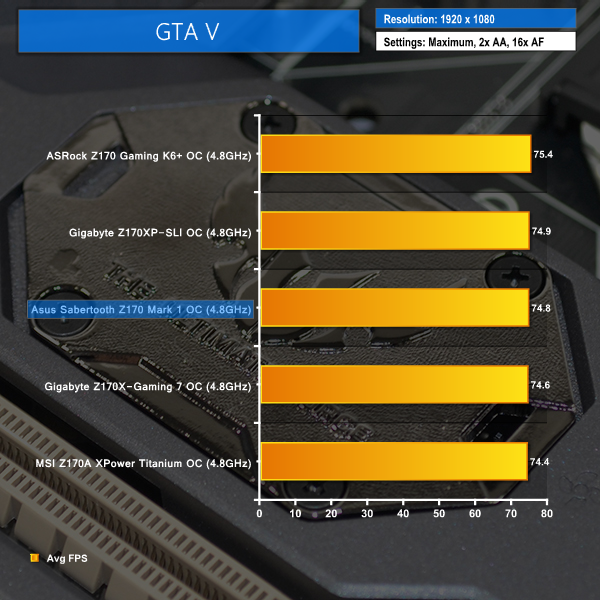
Grand Theft Auto V
We apply very near maximum settings in Grand Theft Auto V and a 1920×1080 resolution to push today’s hardware. Our data was recorded using the built-in benchmark.

Middle Earth: Shadow of Mordor
We used a 1920×1080 resolution and the Middle Earth: Shadow of Mordor built-in benchmark set to ‘Ultra’ quality.
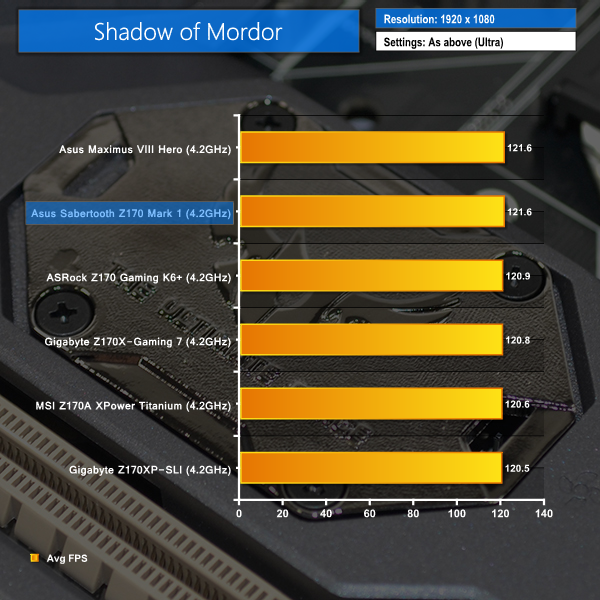
Gaming-related performance is solid. No indications of any motherboard-induced problems here.
SATA
For SATA 6Gb/s testing we use a Kingston HyperX 3K (SandForce SF-2281) SSD.
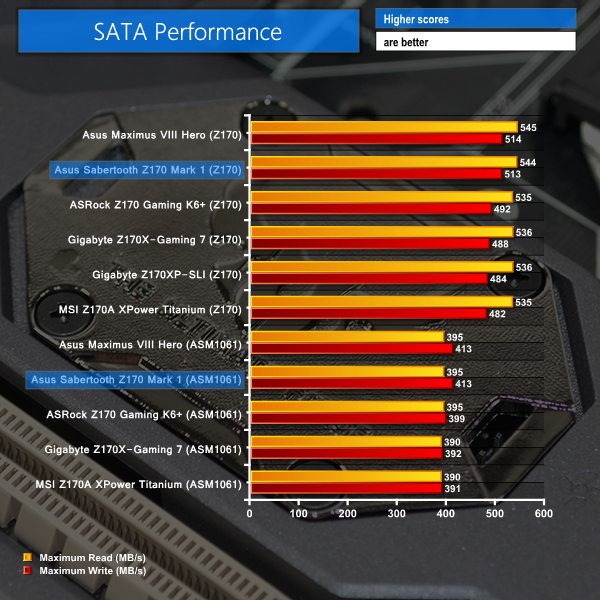
SATA performance is as expected. Asus' Z170-fed ports deliver leading results, while the ASM1061 implementations are also the joint-fastest of all competitors but are significantly slower than Z170 alternatives.
USB 3.0
We tested USB 3.0 performance using the Kingston HyperX 3K SSD connected to a SATA 6Gb/s to USB 3.0 adapter powered by an ASMedia ASM1053 controller. The test system uses Windows 7 with SP1 as the OS.
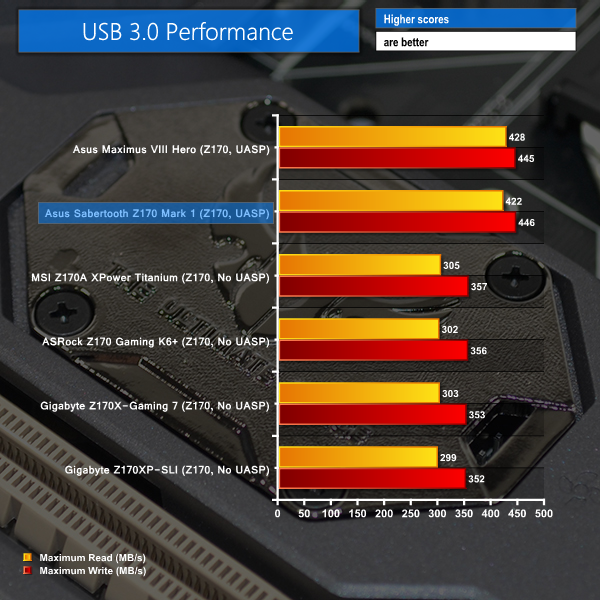
Asus wins the day when it comes to USB 3.0 transfer rates using the Windows 7 OS. This is thanks to Asus' UASP-activating tool that competing manufacturers do not offer.
Audio
We use RightMark Audio Analyzer (RMAA) to analyse the performance of the motherboard’s onboard audio solution. A sampling mode of 24-bit, 192 kHz was tested.
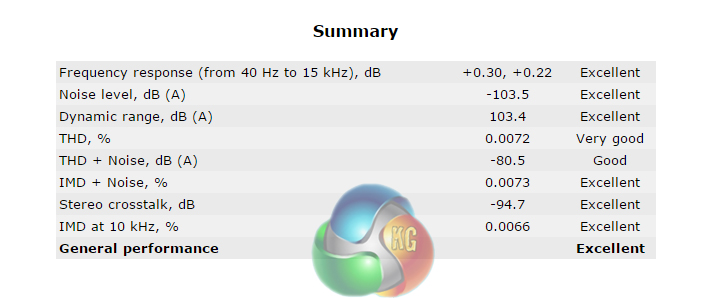
RMAA rates the Sabertooth Z170 Mark 1 motherboard's general audio performance as ‘Excellent‘. Frequency response, noise level, and dynamic range numbers are particularly impressive.
Automatic CPU Overclocking:
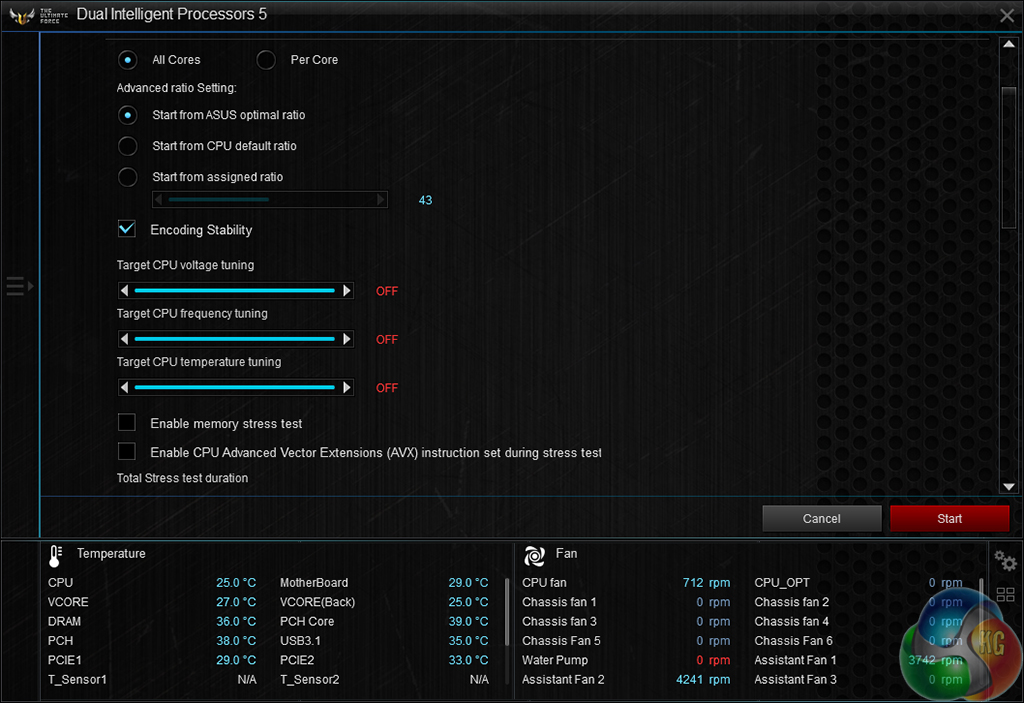
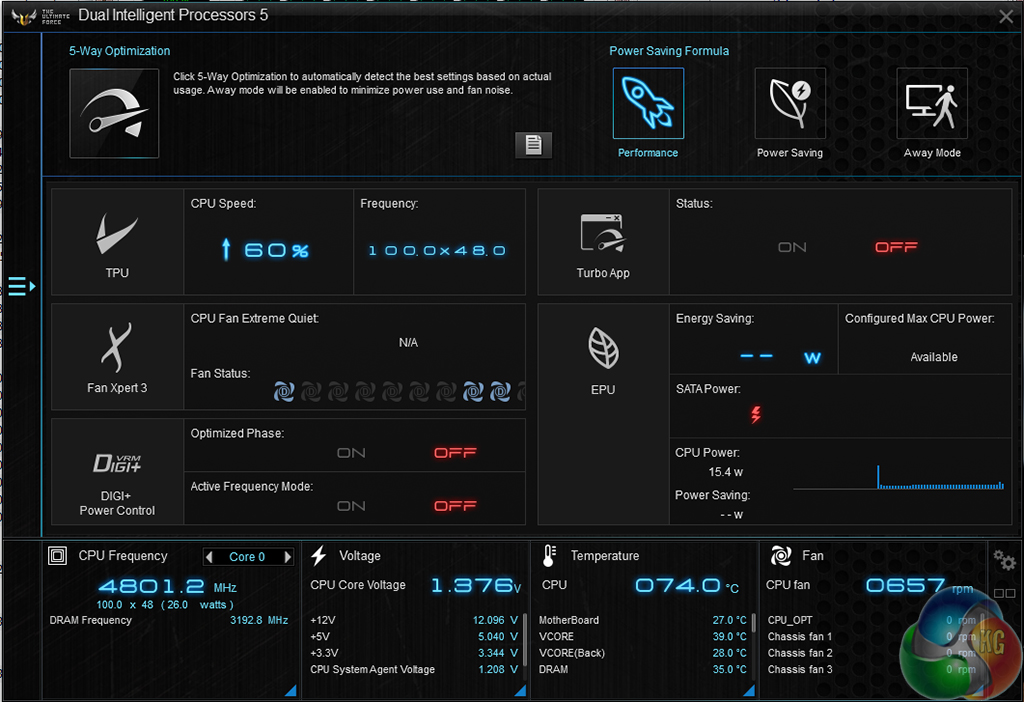
Asus gives users many ways to automatically overclock their system with the Sabertooth Z170 Mark 1 motherboard. There are presets and automated options in the UEFI, however we chose to take a look at the AI Suite 3 OS software-based overclocking route.
The settings screen allows for preferences such as encoding stability and all-core frequency levels to be applied.
With encoding stability and an all-core overclock selected, Asus' Sabertooth Z170 Mark 1 motherboard overclocked our i7-6700K CPU to 4.4GHz. Voltage levels were sensible however the memory frequency was reduced to 2933MHz (rather than the kit's 3200MHz XMP setting).
Manual CPU Overclocking:
To test the Asus Sabertooth Z170 Mark 1 motherboard’s CPU overclocking potential, we first increased the CPU VCore to 1.40V. We selected Level 5 load-line calibration after trial and error showed that it delivered an acceptable voltage drop under load (24mV below what we applied). Power saving settings were disabled and the cache ratio was set to 45x.
We managed to hit our chip's frequency limit of 4.8GHz with the Sabertooth Z170 Mark 1 motherboard. Overclocking in Asus' UEFI is straightforward, however the LLC settings need clear improvement and increased transparency as to how they work – only trial and error showed that level 5 delivered solid results while other settings provided unreasonable voltage levels (be it too high or too low).
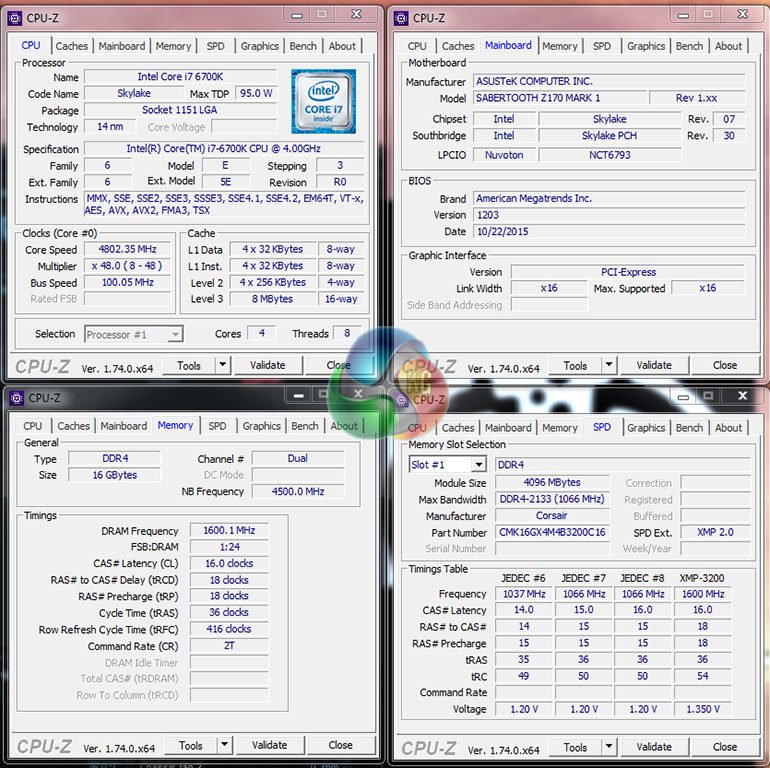
CPU-Z was unable to track the CPU core voltage however Asus' AI Suite software registered the operating level as 1.376V.
We will outline the performance increases that can be obtained from using the Asus Sabertooth Z170 Mark 1 motherboard to overclock our system. Our overclocked processor frequency was 4.8GHz and memory speed was maintained at 3200MHz.
As a performance comparison, we have included the overclocked results from four other Z170 motherboards. The maximum overclocked configuration achieved with each board was a 4800MHz (48 x 100MHz) processor frequency and 3200MHz CL16 memory speed.
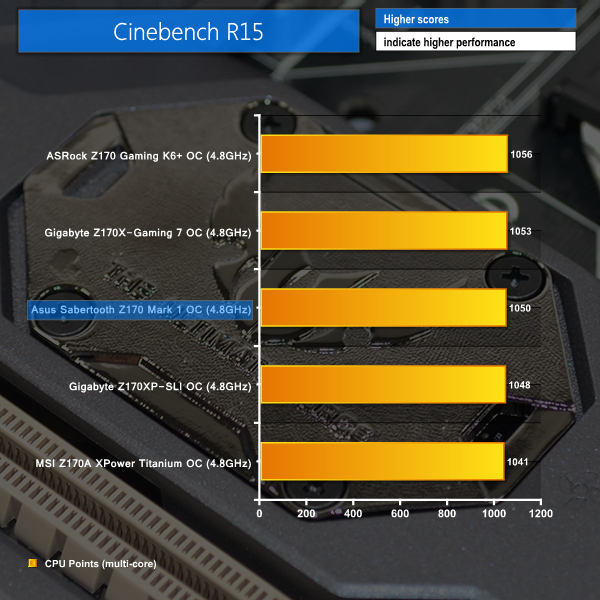
A CPU overclock delivers healthy gains for the Asus Sabertooth Z170 Mark 1 motherboard. The board still sits in the middle of the pack as far as performance goes, but there are no glaring issues and the result differentials are very minor.
We measured the power consumption with the system resting at the Windows 7 desktop, representing idle values.
The power consumption of our entire test system (at the wall) is measured while loading only the CPU using Prime95′s in-place large FFTs setting. The rest of the system’s components were operating in their idle states, hence the increased power consumption values (in comparison to the idle figures) are largely related to the load on the CPU and motherboard power delivery components.
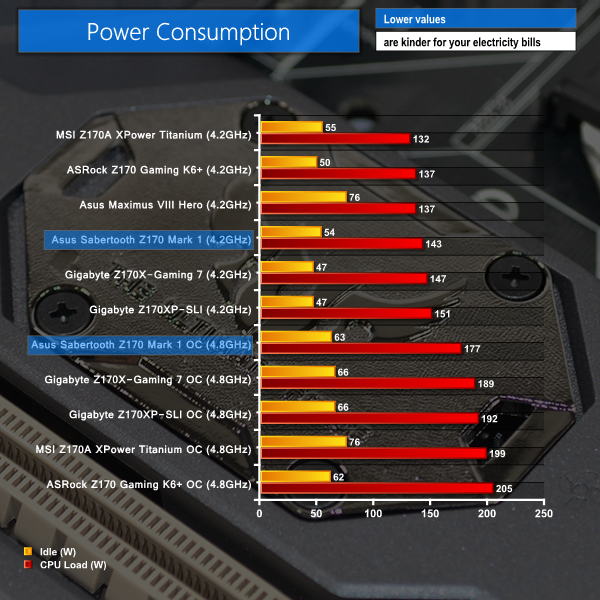
Power consumption from the Asus Sabertooth Z170 Mark 1 motherboard is mediocre for a Z170 part. Stock clocks see the idle level a little over 50W for our test system, while load demands almost 150W.
Applying the hefty overclock sees power consumption increase noticeably. Due to the LLC settings which force voltage down to 1.376V however, the Sabertooth's load power consumption reading is deceptively positive.
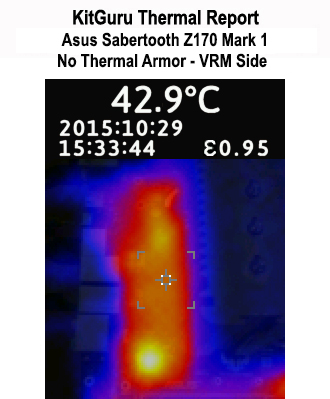
We looked at the performance of Asus' Sabertooth Z170 Mark 1 motherboard through a thermal imaging camera.
For this process, the i7-6700K was overclocked to 4.8GHz using a core voltage of 1.4V so that we could push a large amount of power (therefore heat) through the VRM components. Our test system's Noctua NH-D14 CPU cooler was used and we relied upon the onboard GPU so that an add-in graphics card did not affect the displayed readings.
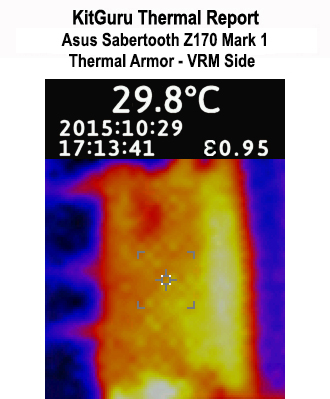
Note: The temperature reading displayed is the temperature at the point on which the camera cross-hairs is focusing. Therefore, lower temperature does not necessarily mean better performance – the coloured heat map should also be examined.

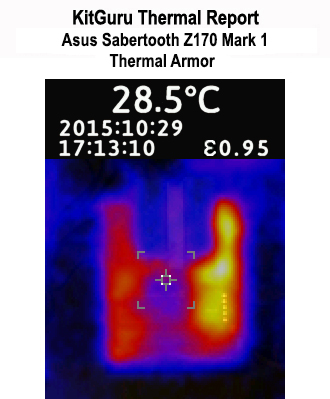
Side-by-side images of the Sabertooth Z170 Mark 1 motherboard with its Thermal Armor attached and with it removed show how the heat spread differs between the configurations. Thermal Armor helps to mask heat from our thermal imaging camera, implying that it is serving its function of segregating motherboard heat from that of other components (namely PCIe devices).
Note how the focus point on the Thermal Armor image is a significantly lower temperature than that of the no Thermal Armor image. This shows how the 35mm ‘northbridge' fan forces cool air beneath the plastic shield.
That hot-spot in the upper-right corner of the Thermal Armor equipped configuration is hot air being dumped out of the VRM cooling chamber onto the upper edge of memory modules. When installed inside a chassis, roof-mounted exhaust fans should help to remove this heat.
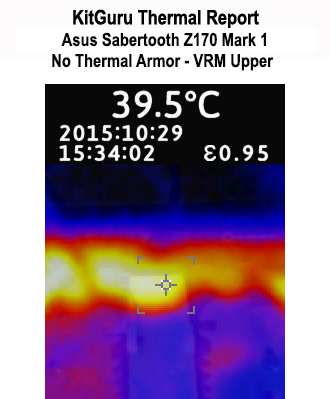

Looking at the VRM area shows how Thermal Armor continues to constrict the VRM circuitry heat to within its plastic shield. This allows the 40mm rear IO fan to blow cool air directly across the VRM heatsink and flush the thermal energy.
Preventing the VRM circuitry heat from rising up onto the underside of an air CPU heatsink may provide benefits in the form of enhanced processor cooling performance (albeit slightly).
The same trend is shown when examining the side VRM area. Thermal Armor does a solid job at segregating the heat-producing sources in important locations (such as around the VRM components).
The Asus Sabertooth Z170 Mark 1 motherboard delivers strong performance and a solid array of features in a unique package designed for extensive thermal control.
Performance from the motherboard is solid. Test results do not quite put the Sabertooth at the top of our charts, however the performance gaps are typically very small. Overclocking was equally good with our chip's 4.8GHz limit being reached with ease. That said, the LLC settings could definitely use some form of explanation to make them easier for users to understand.
Asus' UEFI implementation is superb. The interface is easy to navigate and it provides most of the core features that one could ask for. I would, however, like to see some form of tool comparable to ‘Board Explorer‘ which is found on ASRock and MSI boards. This would aid troubleshooting processes.
The Sabertooth's feature set is strong, with plenty of SATA ports, 10Gbps USB 3.1 connectivity, dual Gigabit NICs, and support for two M.2 PCIe SSDs. This level of features is to be expected from an almost £200 motherboard, but the thermal-orientated additions are the unique items.
Love it or hate it, Thermal Armor is undeniably unique in the way that it segregates heat producing components and the motherboard's PCB and chipsets. The ability to install active cooling on the motherboard helps to mitigate temperature worries and promote enhanced stability.
With that said, there is the concern that PCB heat can get trapped beneath the plastic cover. And let's not forget that this system is intended for use with small cooling fans which produce substantial amounts of noise at higher speeds levels. But then there's the 5-year warranty for peace of mind.
![]()
Available for just under £200 at OverclockersUK, the Asus Sabertooth Z170 Mark 1 motherboard nips at the heels of the Z170 chipset's most premium-priced offerings. The only higher-priced offerings tend to be each vendor's extreme overclocking or highest-end enthusiast/gaming SKUs.
For just under £200, the Asus Sabertooth Z170 Mark 1 provides a lot of motherboard with plenty of unique features. Asus' board is a strong purchasing candidate if your desire for validated components and ability to manage thermal performance offset the relatively loud cooling fans and minor negatives.
Discuss on our Facebook page, over HERE.
Pros:
- Plenty of features and expandability.
- Solid manual overclocking results and good automated overclocking capabilities.
- Excellent UEFI implementation.
- Plenty of controllable fan headers, even for watercooled builds.
- TUF Fortifier mitigates PCB bending (enhanced support for large CPU coolers).
- Unique appearance.
- 5-year warranty.
Cons:
- Onboard fans can get very loud, but are speed controllable.
- OS software can be a little buggy on times (with our Windows 7 test OS).
- Some minor points – no debug display and no rear clear CMOS button.
KitGuru says: Asus' Sabertooth offering is always a unique SKU due to its intense focus on thermal performance. The Z170 edition is no different and registers itself as a strong competitor that offers something different in the high-end motherboard crowd.